Design, UI, UX, Insights, Web Development
What is Prototype Design? [Guide 2024]
Everything you need to know about prototypes and the prototyping process
Prototypes are the foundation of effective prototype design in web development, guiding the transformation of ideas into smooth digital experiences. They are the clear plans that designers rely on to craft user-centric interfaces.
When it comes to web design and web development, the concept of design thinking takes center stage, placing users at the forefront, and urging designers to understand, define, ideate, prototype, and test. Design thinking and prototype creation are closely connected, ensuring prototypes aren’t just visually appealing but also function intuitively.
This article serves as the ultimate pocket guide for designers at all levels, uncovering the prototype design process, from start to finish. You’ll discover valuable tips, tricks, and best practices, alongside insights into the finest prototyping tools. As usual, we provide practical examples to show how prototype design translates theory into impactful digital solutions.
Now, let’s dive in.
Article Overview
1. Understanding Prototypes
Prototyping in web design is akin to creating a blueprint before building a house. It’s a preliminary model or draft that allows designers to test and refine ideas before actual development. Imagine a shoe designer who sketches several designs before creating physical prototypes to test comfort and style before mass production.
1.1. Design Thinking: The User-Centric Approach
Design thinking is a problem-solving approach focused on understanding users’ needs and experiences. In web design, it’s about empathizing with users, defining problems, ideating solutions, and prototyping to create user-centric interfaces.
For example, a web designer empathizes with users by conducting surveys and interviews to understand their preferences before creating prototypes tailored to their needs.
1.2. What are prototypes and what is their purpose in web design?
Prototypes in web design are interactive models or drafts of a website or application. They’re preliminary versions that simulate the functionality and appearance of the final product. Their primary purpose is to test and refine ideas before the actual development phase.
Consider a blueprint or rough sketch of a building before construction begins. Similarly, a prototype in web design serves as a preliminary model that helps designers and stakeholders visualize how the website or app will function and look before investing in full development.
The purpose of prototypes can be narrowed down to the following:
- Testing Functionality: Prototypes allow testing of different features and functionalities to ensure they meet user needs.
- Gathering Feedback: They serve as tools for collecting feedback from stakeholders and potential users early in the design process.
- Refinement: Prototypes facilitate iterations and refinements, allowing designers to improve the user experience based on feedback and testing.
- Validating Early Concepts: Prototypes in design sprints bring concepts to life rapidly, aligning stakeholders on the design’s direction and providing a realistic depiction of the user experience.
- Facilitating Communication: Tools like Figma offer commenting features, aiding in effective communication between designers and non-designers, ensuring everyone comprehends and contributes to the design process.
- Refining Features and Flows: User testing with prototypes exposes UX challenges that might have been overlooked in planning, enabling quick adjustments to the UI and refining the user experience.
Example: Before launching a new eCommerce platform, designers create prototypes to simulate user interactions, ensuring seamless navigation and easy checkout processes. This allows them to identify and address usability issues before the final website development stage.
1.3. Why does prototyping matter in the UI/UX process?
Prototypes serve multiple purposes in UI/UX by acting as visual representations that help in visualizing concepts, gathering feedback, and testing functionality. They refine the user experience, ensuring interfaces are intuitive and engaging.
A simple way to think of prototypes is as a mechanism to demonstrate functionality. They make the concept tangible, moving from ideas to something stakeholders and users can understand and appreciate.
⭐ Benefits of Prototyping:
- Making it Real: Prototypes bridge the gap between concepts and reality, aiding stakeholders in visualizing the final product.
- Problem Solving: Prototypes enable quick visualization of design challenges and introduce solutions swiftly, allowing for rapid iteration.
- Iterative Evolution: From sketches to high-fidelity designs, prototypes evolve ideas, offering various behaviors and functions for testing and refinement.
- Detecting Unintended Scenarios: Visible prototypes uncover product limitations, providing context on what should and shouldn’t be in the final product.
- Spotting Usability Problems: Prototypes expose usability challenges, making them easier to identify and address.
- Standard Presentation: Prototypes, at any stage, are standard for presentation, aiding in testing versions and presenting products to clients.
In short, when presenting a website’s prototype to stakeholders, it’s like showcasing a model home to potential buyers; it gives a tangible feel of what the final product will be like.
Wireframing and prototyping are both vital in design, but they’re not the same. Each has a unique purpose and fits into different stages of the design process. If you’re finding the terms confusing, check out our guide on wireframes vs. prototypes where we break the two concepts down and explain the differences.
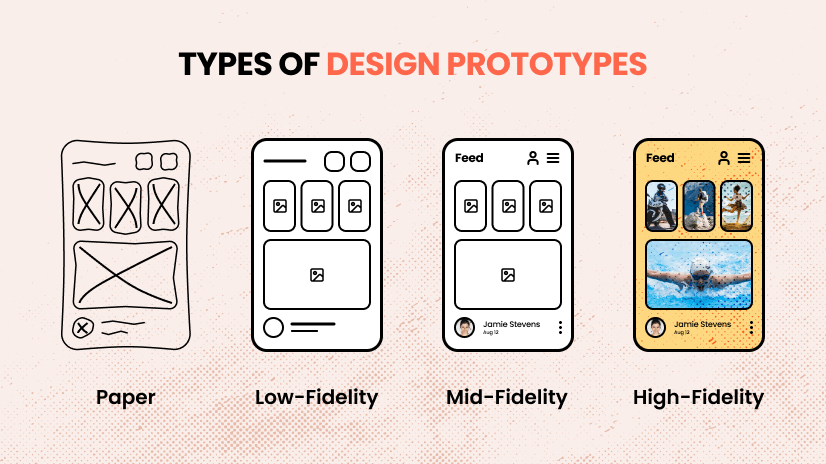
Prototypes come in various forms, each serving distinct purposes in the UI/UX design process. From low-fidelity to high-fidelity, each prototype type offers unique advantages and limitations, catering to different stages and needs in design.
2.1. Low-Fidelity vs. High-Fidelity Prototypes: Understanding the Difference
First, low-fidelity prototypes are basic representations, often hand-drawn or created with simple tools like paper or wireframes. They focus on fundamental concepts and layouts without intricate details.
In contrast, high-fidelity prototypes are more polished and detailed. They closely resemble the final product in appearance and functionality, often created using design software.
Here are the strengths and weaknesses of each:
- Pros: Quick to create, easy to modify, ideal for conceptualization.
- Cons: Lack of detailed design elements, and limited functionality.
- Pros: Detailed and realistic, useful for user testing and client presentations.
- Cons: Time-consuming, and may lead to premature focus on aesthetics over functionality.
⭐ When Used: Low-fidelity prototypes are ideal for early-stage ideation and concept validation, while high-fidelity prototypes come into play during later stages to refine specific design elements.
Here’s a practical example:
For a mobile banking application project, the low-fidelity prototype represents the initial sketches or digital wireframes outlining the app’s layout and basic structure.
These wireframes highlight main screens like login, account overview, and transaction history, using simple shapes and placeholders for buttons and text, lacking detailed design elements. Interactions in this stage are limited to basic navigational flows, allowing users to tap through screens but without real data or complex functionalities.
In contrast, the high-fidelity prototype showcases a more refined visual design closely resembling the final product. It includes actual fonts, colors, logos, and detailed design elements like buttons and input fields, offering a polished appearance. The functionalities are more comprehensive, allowing users to interact with real or simulated data, perform transactions, and experience more complex navigation and animations akin to the intended final product.
During user testing, the low-fidelity prototype is used initially to gather feedback on the app’s core functionality and layout, enabling testers to focus on the app’s structure without being distracted by detailed design elements. Subsequently, the high-fidelity prototype facilitates testing of visual appeal and finer details, allowing testers to provide feedback on the overall aesthetics, specific design elements, and how well the app aligns with the intended user experience.
2.2. Paper Prototypes: Relevance and Application
As the name suggests, paper prototypes involve sketches or hand-drawn layouts of the interface on paper, allowing for quick ideation and feedback gathering.
⭐ When Used: Paper prototypes are typically employed in initial brainstorming sessions and early design phases to visualize concepts.
- Pros: Rapid creation, cost-effective, and easy to modify during brainstorming sessions.
- Cons: Lack of interactivity, limited for complex design testing.
Here’s a practical example:
In the initial design phase of the educational app, your team has already conducted extensive user research, gathered insights from educators, and defined the app’s core functionalities and content structure.
At this stage, you are brainstorming and ideating the app’s interface and user flow.
You decide to employ paper prototypes to ideate and gather rapid feedback on the app’s initial layout and navigational flow. Using sketches and paper cutouts, you create a series of rough visual representations illustrating various screens, interactions, and possible pathways within the app. These paper prototypes depict features like the home screen, lesson modules, quizzes, and progress tracking.
This stage is perfect for paper prototypes because it allows the team to quickly visualize and experiment with different interface layouts and navigation structures. You can easily make adjustments, swap screen elements, and iterate based on immediate feedback during team discussions and user testing sessions.
2.3. Low-Fidelity Digital Prototypes
These are digital representations created with basic design software. They provide more functionality than paper prototypes but are not as detailed as high-fidelity ones.
⭐ When Used: Low-fidelity digital prototypes bridge the gap between initial concepts and detailed designs, aiding in early user testing and feedback.
- Pros: Increased functionality, better for user interaction testing.
- Cons: Less detailed, may not effectively convey the final product’s look and feel.
Here’s a practical example:
At this stage, your team has completed the initial ideation phase and defined the app’s primary features and functionalities through brainstorming sessions and user story mapping.
You’ve also gathered insights from user research and have a clear understanding of the app’s key user journeys and core elements.
Now it’s time for you to create low-fidelity digital prototypes using design software like Sketch or Adobe XD to translate your ideas into more tangible representations. These prototypes focus on the app’s basic layout, essential functionalities, and core user flows.
Using simple shapes, basic icons, and placeholder content, you create wireframes that illustrate key screens such as the home screen with search functionalities, destination details, itinerary planner, and booking features. The emphasis is on layout, structure, and basic interactions rather than detailed design elements.
2.4. Transitioning to Mid-Fidelity Prototypes
The transitioning process involves enhancing low-fidelity prototypes to incorporate more details and functionality without reaching the complexity of high-fidelity designs.
This stage focuses on refining user experience elements and functional aspects before moving to high-fidelity designs.
Here’s a practical example:
Let’s consider a social media platform undergoing the UI/UX design process. Initially, you as a designer create low-fidelity wireframes or sketches outlining the basic layout and functionalities of the platform.
These low-fidelity prototypes focus on fundamental elements like the arrangement of posts, basic navigation, and key features.
As the design progresses, your team moves to mid-fidelity prototypes. At this stage, you will enrich the wireframes by adding more refined design elements, such as specific icons, more detailed user profile views, and slightly enhanced interactivity. For example, instead of placeholder icons, you can integrate actual icons resembling those intended for the final product. The layout becomes more fleshed out, incorporating more design nuances without the high level of detail seen in the final product.
In this transition phase, the mid-fidelity prototype serves as a bridge between the basic structure of the low-fidelity stage and the polished, detailed interface of the high-fidelity prototypes. It allows you to focus on refining user experience elements, testing more specific functionalities, and gathering feedback on the evolving design before investing substantial time and effort in high-fidelity detailing.
2.5. High-Fidelity Digital Prototypes: Significance and Application
The highest level in terms of fidelity is the high-fidelity digital prototype which is a detailed digital representation closely resembling the final product, incorporating intricate design elements and functionality.
⭐ When Used: These prototypes are used for final user testing and presentations, offering a near-real experience of the product.
- Pros: Realistic representation, valuable for user testing and client presentations.
- Cons: Time-consuming, and may divert focus from functionality to aesthetics.
Here’s a practical example:
Your team has gone through extensive iterations, user testing, and design refinements in the earlier stages. You’ve validated the core functionalities, user flows, and visual elements through low and mid-fidelity prototypes.
Now, you’re in the final stage before the actual development of the e-commerce platform.
At this point, your team aims to create a high-fidelity digital prototype using advanced design tools like Figma or Adobe XD. This prototype focuses on refining the visual design, incorporating detailed elements, and mirroring the final product as closely as possible.
The high-fidelity prototype showcases the polished user interface, intricate design elements, actual content, and realistic interactions. It includes refined visual components such as high-resolution images, finalized typography, branded elements, detailed product pages, interactive shopping carts, and checkout processes.
This stage is ideal for high-fidelity digital prototypes because it allows you to present a near-final representation of the eCommerce platform to stakeholders, clients, or investors for final approval.
Prototypes possess several critical qualities that define their nature and usefulness in the design process. These qualities include:
⭐ Presentation
This refers to how prototypes look, whether they’re on paper, a phone screen, or a computer. They can be sketches, digital drawings, or even fully working versions. Each type helps designers see and test different parts of their design.
⭐ Precision
Precision is how detailed a prototype is. Some are simple, showing just the basic idea, while others look almost like the final product. This affects how well people understand and give feedback on the design.
⭐ Interactivity
It’s about how much you can do with a prototype. Some let you click, type, and use all the features, while others might only let you see things. This affects how much users can try out and how much testing you can do.
⭐ Evolution
Evolution is about how prototypes change over time. Some are made quickly, tested, and thrown away for better versions. Others keep getting better until they become the final product. This affects how fast you can improve and refine the design.
Prototyping isn’t just about perfecting the final product. It involves testing every idea, no matter how basic or early it is. Designers should prototype at every stage, trying out different versions to see what works best. It helps explore various solutions and ensures that every design idea gets tested and validated.
How does each quality impact the design process and user experience?
To explain this, let’s imagine you’re designing a Social Media App. Let’s explore each quality, considering this particular case.
As your team begins designing a new social media app, you start with paper sketches, mobile wireframes, and desktop simulations. The paper sketches help brainstorm the layout of the home feed, while mobile wireframes focus on user profiles and interactions. Desktop simulations offer insights into how users might engage with the app on larger screens. Each presentation format aids in understanding how users might interact with the app on different devices.
As you refine the prototypes, low-fidelity versions outline the app’s basic structure and functionalities, emphasizing user flow and initial interaction. Progressing to high-fidelity prototypes, you refine the design with specific fonts, colors, and detailed interface elements. The precision impacts user feedback; low-fidelity prototypes gather insights on navigation, while high-fidelity ones validate the aesthetic appeal and usability of specific design elements like icons or buttons.
Throughout the process, prototypes vary in interactivity levels, providing different user experiences. Fully functional prototypes enable simulated posting, messaging, and feature exploration. Limited interactivity prototypes might only allow users to view content. This influences user engagement depth and helps determine how users interact with the app’s features.
Regarding evolution, some prototypes are quickly developed, tested, and replaced based on early user feedback. Others undergo gradual refinements, evolving based on ongoing user testing. This iterative process impacts the pace and depth of design improvements, guiding your team toward the final product.
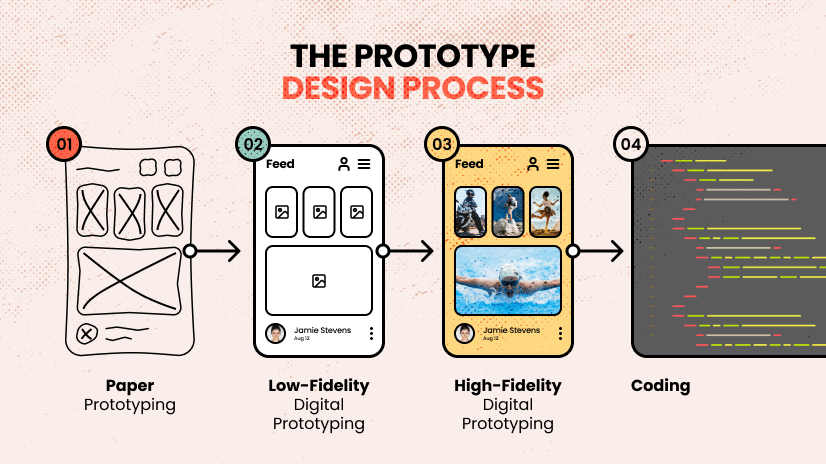
The prototype design process follows a structured path, starting from initial sketches to fully functional models. This section outlines a step-by-step guide through different prototyping stages—paper, low-fidelity digital, high-fidelity digital, and optionally, coding. Now let’s see each step and essential pre-project considerations to have so you can deliver user-centric solutions.
⭐ Step 1: Paper Prototyping
Start by sketching out rough designs on paper. For instance, if creating a shopping app, sketch basic layouts for the homepage, product display, and checkout process. These sketches will help visualize the app’s structure and flow before moving to digital formats.
⭐ Step 2: Low-Fidelity Digital Prototyping
Translate your paper sketches into digital wireframes. Using software like Sketch or Figma, create basic digital representations of your sketches. For the shopping app, create wireframes depicting the homepage layout, product listings, and a simple checkout process. Focus on structure and functionality rather than intricate design elements.
⭐ Step 3: High-Fidelity Digital Prototyping
Refine your digital wireframes into high-fidelity prototypes. Add detailed design elements, actual content, and interactive features. For the shopping app, include specific product images, detailed UI elements, and interactive buttons mimicking the final product’s look and feel.
⭐ Step 4: Coding (Optional):
If applicable, proceed to coding the prototype into a functional model. For the shopping app, this step involves translating the high-fidelity design into a clickable prototype using HTML, CSS, and basic JavaScript. This phase allows for a more interactive and realistic user experience.
4.1. Considerations Before Initiating a Client Project
Before starting a client project, consider key factors:
- Client’s Vision: Understand the client’s goals, target audience, and desired outcomes. For example, if the client envisions an e-commerce platform, grasp their unique selling points and user expectations.
- User Research: Conduct thorough research to comprehend user needs and behaviors. For the shopping app, research user preferences in online shopping, preferred features, and pain points they encounter.
- Feasibility: Assess technical feasibility. Determine if the proposed features align with the technology available and the project’s timeline and budget.
- Collaboration: Ensure effective communication and collaboration between your team and the client. Set clear expectations and establish a feedback loop to align on design directions.
By considering these aspects before initiating a client project, you ensure your prototype aligns with the client’s vision, user needs, and technical feasibility.
Please note that prototyping is only a small part of the entire UX design process. For a more comprehensive review, check out our guide to everything you need to know about the UX design process.
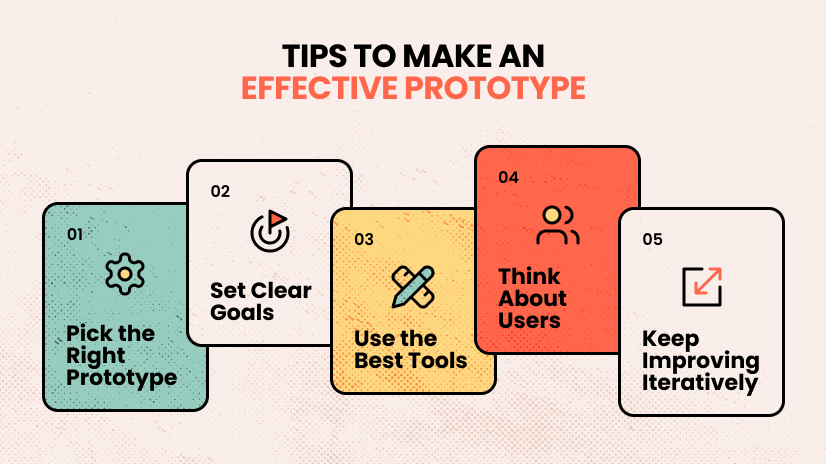
Creating prototypes is a key part of design, but it doesn’t have to be overly complicated. This section shares some helpful tips for making prototypes that people like and find easy to use. Let’s go through these tips:
⭐ Tip #1: Pick the Right Prototype
Depending on where your project is at, start with simple prototypes to explore ideas. As things progress, switch to more detailed prototypes to test specific parts of your design. This way, your prototype matches how much you’ve figured out about your project.
⭐ Tip #2: Set Clear Goals
For each prototype, know exactly what you want to achieve—whether it’s testing a feature or getting feedback on how users interact with it. Having clear goals keeps your testing focused and helps you improve your final product.
⭐ Tip #3: Use the Best Tools
Choose tools that suit your team and project needs. Whether it’s simpler tools like Sketch or Figma for basic prototypes, or more advanced software like Adobe XD or InVision for detailed ones, the right tools make things smoother and help your team work better together.
⭐ Tip #4: Think About Users
Understand what users want and need by doing thorough research. Make prototypes that match their preferences and expectations. Keep things easy to navigate and make sure they align with what users want, making your prototype more inviting and user-friendly.
⭐ Tip #5: Keep Improving Iteratively
Make prototypes in stages and improve them based on feedback. Doing things step by step and making small changes along the way helps you catch problems early and make a final product that users will love.
HTML & JavaScript Prototyping involves creating prototypes using web technologies like HTML, CSS, and JavaScript. These prototypes mimic the functionality and interactions of the final product, bridging the gap between design and development. Unlike static prototypes, HTML & JavaScript prototypes offer a dynamic experience, showcasing how elements would function in a web environment.
Now let’s see the benefits and considerations of this approach.
- Interactivity: Real-time interaction, simulating user experience and functionality closer to the final product.
- Realistic Behavior: By incorporating JavaScript, prototypes exhibit dynamic behavior, such as form validations, animations, and responsive elements.
- Ease of Testing: More accurate representation of how users will interact with the actual product.
- Developer Collaboration: This enables a smoother transition from design concepts to code implementation.
- Complexity: Creating HTML & JavaScript Prototypes might be more time-consuming and complex compared to static prototypes.
- Maintenance: These prototypes closely resemble the final product, so maintaining consistency between the prototype and the actual implementation is an absolute must.
Tip: When implementing HTML & JavaScript Prototypes, try a component-based approach. Breaking down the design into reusable components makes development faster and maintains consistency throughout the prototype. Of course, don’t forget the responsiveness of the prototype. It should seamlessly adapt to different screen sizes and devices, which will make the user experience authentic.
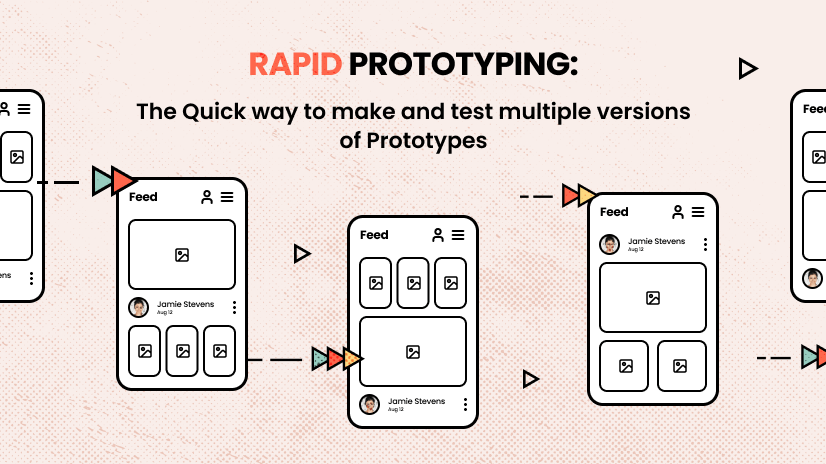
Rapid prototyping is a design method focused on quickly making and testing multiple versions of prototypes. It’s all about speed, allowing designers to create and improve prototypes swiftly, unlike slower traditional methods.
This approach values making lots of changes based on quick feedback, helping designers make better decisions faster. It’s beneficial because it speeds up decision-making, encourages teamwork, and can save time and money during product development.
However, it needs the right people, tools, and time to work well, and sometimes balancing speed with making a really good prototype can be a challenge.
- Faster Decision-Making: The quick generation and testing of prototypes makes decision-making easier, leading to more informed design choices.
- Enhanced Collaboration: Encourages collaboration among team members, stakeholders, and end-users by facilitating quicker feedback loops.
- Cost and Time Efficiency: Saves both time and costs during the development phase.
- Sufficient Resources: Rapid prototyping requires dedicated resources, including skilled personnel, tools, and time, to ensure effective implementation.
- Balancing Speed and Quality: The focus on speed might sometimes compromise the depth of prototype refinement.
Rapid prototyping, though fast, aims to create better, user-friendly final products by making quick changes and involving everyone in the process.
8. Tools for Prototyping
Now that we’ve clarified the role, types, and benefits of prototyping, let’s dive into the favored tool among UI/UX designers:
8.1. Adobe XD

Official Adobe XD opening video by Adobe
Adobe XD, a vector-based tool, stands out for wireframing, prototyping, and collaboration. Its integration with Adobe Cloud offers compatibility with Photoshop, Illustrator, and After Effects files, providing extensive design flexibility. This subscription-based tool grants access to Adobe Fonts and Adobe Stock, enhancing the design capabilities within a single account. With the option to work offline or online, it ensures adaptability.
- Suitable for wireframing and prototyping at various fidelity levels
- Auto Animate tool enables effortless advanced animations
- 3D layering of images
- Supports linking pages with diverse animation templates and multiple artboards in a project
- Lacks real-time collaboration features
- Limited mobile preview support for Android devices
8.2. Figma
Official Figma opening video by Figma
Figma is a cloud-based tool, that offers lightning-fast functionality, facilitating seamless collaboration across multiple teams. It’s highly favored among UI/UX designers for its intuitive interface and FIGJAM, an online whiteboard ideal for brainstorming, presentations, diagram creation, sitemaps, and team collaboration.
- Versatile tools for crafting wireframes and prototypes across varying fidelity levels
- Auto Layout feature for flexible design adjustments as content changes
- Figma Smart Animate for layer animations between frames
- File sharing with permission-based access
- Solely accessible online
- Absence of a global colors module, challenging customization
- Requires a system with over 4GB RAM and a high-quality graphics card to run efficiently
Design and prototyping are key in the creative process, and many designers favor Figma. But if you’re looking for other options, we’ve rounded up 10 top-notch Figma alternatives for prototyping and design. These alternatives help spot issues early on, making the design process smoother and more effective.
8.3. InVision

InVision is widely embraced by UI/UX designers. It enables the transformation of static screenshots into clickable interactive prototypes. As a browser-based application, it excels in fostering collaboration among various stakeholders.
- Wireframing and interactive prototyping tools
- Project management features tailored for designers
- Real-time design meetings and live demos
- Version history tracking
- High cost for team usage
- Lack of real-time editing capabilities
- Limited integration, necessitating work import from InVision Studio (available on Windows and Mac), into other design tools
- Potential integration issues
8.4. JUSTINMIND

A comprehensive all-in-one (AIO) platform, it facilitates the creation of wireframes and high-fidelity interactive prototypes from scratch. Featuring a user-friendly drag-and-drop interface, pre-made templates, and a toolkit for animations, interactions, and real-time collaboration.
- Robust tools for wireframing and prototyping, suitable for mobile and web products
- Extensive library of easy-to-use pre-made templates
- Incorporates the Hotspot feature for enhanced interactivity
- Steeper learning curve compared to other tools, especially for prototyping
- Potential long-term expenses
- Requires more tutorials or guidance for users
8.5. Balsamiq
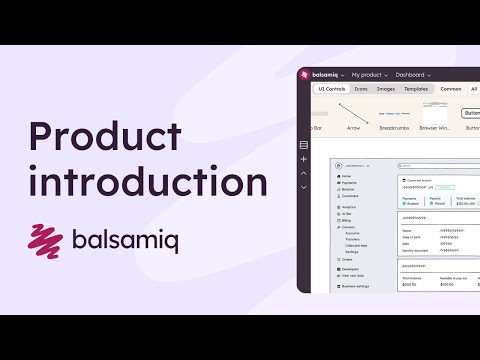
Differing from the previously mentioned tools, Balsamiq specializes in sketching, wireframing, and creating mockups. It operates as a cloud-based platform, known for its user-friendly interface and extensive widget library.
- Swift creation of mockups
- Allows easy and rapid modifications
- Limited collaboration options
- Doesn’t support interactive prototyping
Let’s Wrap It Up!
To sum up, prototyping remains an important part of web design and web development processes. It helps bridge ideas into user-friendly digital experiences. The key lessons for designers include adopting iterative methods, choosing suitable prototyping tools, and prioritizing user-centric design at every stage. Practical steps involve starting prototypes early, using collaborative tools, and consistently seeking user input for refining designs.
Prototyping acts as both a guide and an evolving process, crafting exceptional digital experiences that meet user needs and project objectives.
In the meantime, let’s explore more insights and resources on web design and web development by checking out our other articles!