The Microsoft Security Essentials Tech Support Scam is a Trojan from the Trojan.Tech-Support-Scam family that displays a fake Windows alert stating that Microsoft Security Essentials detected a problem with a file on your computer. This alert will cover your screen and not allow you to access your desktop and programs while pretending to be an error message when trying to boot Windows.
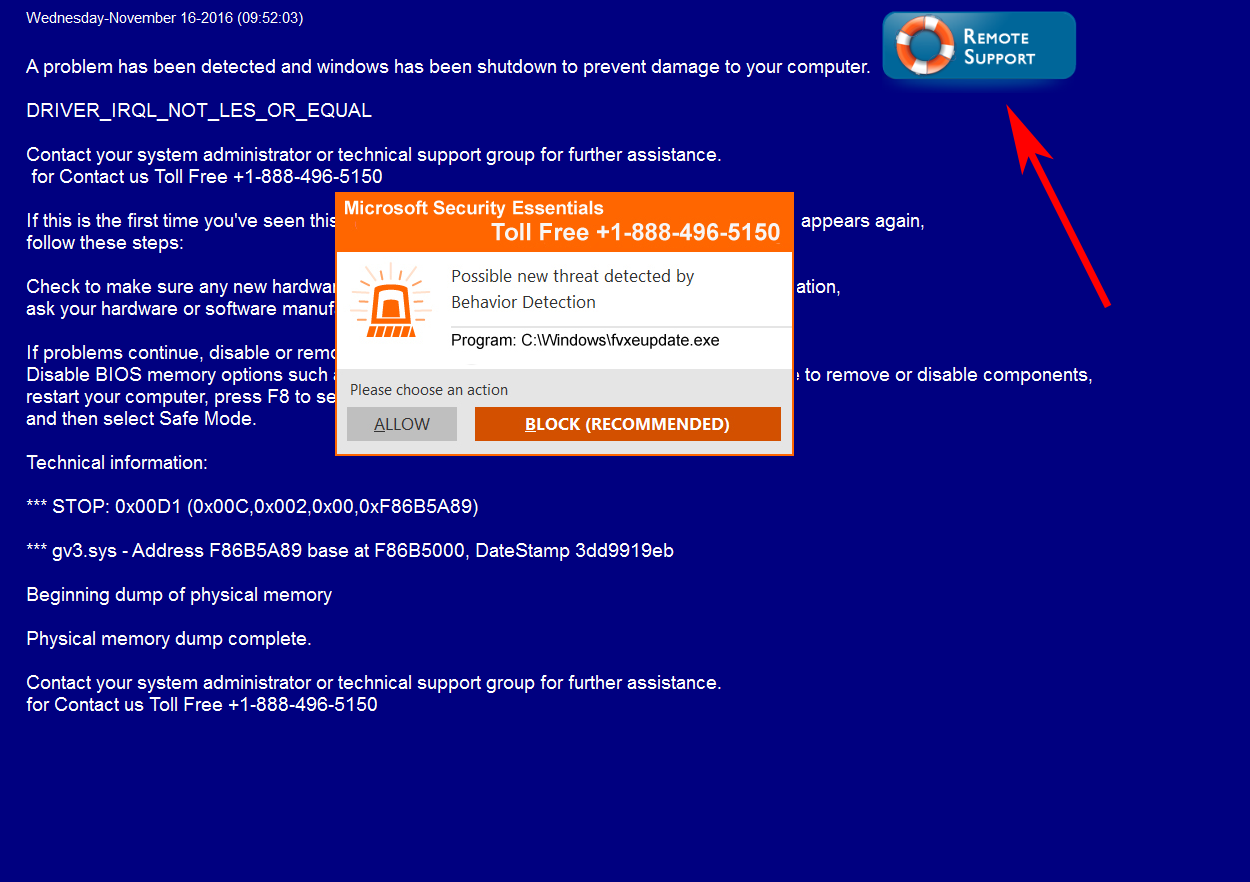
This error message further states that there is a problem with the C:\Windows\fvxeupdate.exe file and that you should contact 1-888-496-5150 in order to get help.
In reality the computer is infected with a Trojan that displays this fake alert, and other than this scam, there is nothing actually wrong with the computer. This alert is being shown solely to scare you into calling the listed phone number so that the scammers can try and sell you unnecessary services and software.


The text of the Microsoft Security Essentials Tech Support Scam is:
A problem has been detected and windows has been shutdown to prevent damage to your computer.
DRIVER_IRQL_NOT_LES_OR_EQUAL
Contact your system administrator or technical support group for further assistance.
for Contact us Toll Free +1-888-496-5150
If this is the first time you've seen this stop error screen, restart your computer, If this screen appears again,
follow these steps:
Check to make sure any new hardware or software is properly installed. If this is a new installation,
ask your hardware or software manufacturer for any windows updates you might need.
If problems continue, disable or remove any newly installed hardware or software.
Disable BIOS memory options such as caching or shadowing. If you need to use Safe Mode to remove or disable components,
restart your computer, press F8 to select Advanced Startup Options,
and then select Safe Mode.
Technical information:
*** STOP: 0x00D1 (0x00C,0x002,0x00,0xF86B5A89)
*** gv3.sys - Address F86B5A89 base at F86B5000, DateStamp 3dd9919eb
Beginning dump of physical memory
Physical memory dump complete.
Contact your system administrator or technical support group for further assistance.
for Contact us Toll Free +1-888-496-5150
The text of the Microsoft security essentials alert is:
Toll Free +1-888-496-5150
Possible new threat detected by Behavior Detection
Program: C:\Windows\fvxeupdate.exe
This scam includes a button on the fake alert that is labeled Remote Support. When you click on this button, it will minimize the fake alert and open Internet Explorer to https://www.fastsupport.com. The good news is that while this screen is minimized you can access your computer as normal. Using this technique we will remove the infection from a computer.
How did the Fake Microsoft Security Essentials Tech Support Scam get on my computer?
It is important to note that this Trojan is installed by other programs that did not adequately disclose that other software would be installed along with it. Therefore, it is important that you pay attention to the license agreements and installation screens when installing anything off of the Internet. If an installation screen offers you Custom or Advanced installation options, it is a good idea to select these as they will typically disclose what other 3rd party software will also be installed. Furthermore, If the license agreement or installation screens state that they are going to install a toolbar or other unwanted adware, it is advised that you cancel the install and not use the free software.
As you can see, this scam was created to trick you into calling the listed number so that the developers can try and convince you into purchasing unnecessary services or software. For no reason should you call this number, and if you have already have purchased services, I advise you to dispute the charges with your credit card company. To remove this Trojan and any related software for free, please use the removal guide below.
Fake Microsoft Security Essentials Tech Support Scam Removal Options
Self Help Guide
If you are uncomfortable making changes to your computer or following these steps, do not worry! Instead you can get free one-on-one help by asking in the forums.
To remove Fake Microsoft Security Essentials Tech Support Scam, follow these steps:
- STEP 1: Print out instructions before we begin.
- STEP 2: Minimize Tech Support Scam Screen
- STEP 3: Use Task Manager to terminate a process and start Explorer
- STEP 4: Use Rkill to terminate suspicious programs.
- STEP 5: Scan and clean your computer with Emsisoft Anti-Malware
- STEP 6: Use AdwCleaner to remove adware from a computer.
- STEP 7: Use HitmanPro to scan your computer for badware
- STEP 8: Run Secunia PSI to find outdated and vulnerable programs.
This removal guide may appear overwhelming due to the amount of the steps and numerous programs that will be used. It was only written this way to provide clear, detailed, and easy to understand instructions that anyone can use to remove this infection for free. Before using this guide, we suggest that you read it once and download all necessary tools to your desktop. After doing so, please print this page as you may need to close your browser window or reboot your computer.
The Fake Microsoft Security Essentials Tech Support Scam Trojan includes a built-in backdoor for the remote support company to close the fake crash screen when a victim pays them for services. To get to this screen, simply click on the Remote Support button as indicated by the red arrow in the image below. This will cause Internet Explorer to open to a web site, which you can close. You can then access your computer to perform the rest of the steps.
Once the fake alert is closed, you can proceed to the next step where you will terminate the malware process and launch Windows Explorer so you can get your desktop back.
As Fake Microsoft Security Essentials Tech Support Scam makes it so you are unable to acces your Windows desktop, you need to open the Windows Task Manager from the Windows Security screen. To do this, press the CTRL+ALT+DEL  keys on your keyboard at the same time to display the Windows Security Screen as shown below.
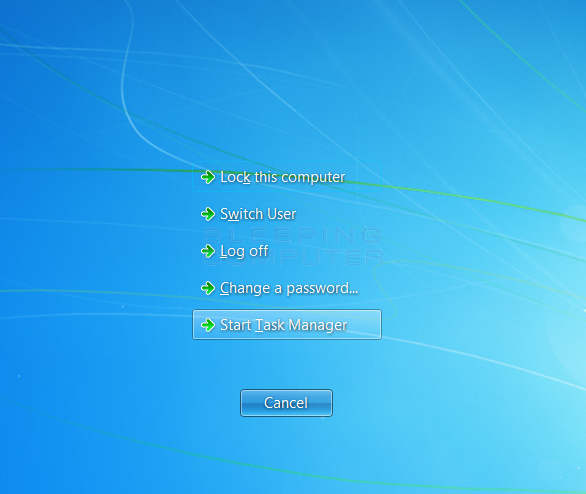
At this screen, click on the Task Manager option to start the Windows Task Manager.
You will now be at the Task Manager screen as shown below. If you are in Windows 10, you will need to click on the More Details option and the screen will look a little different. Make sure you are in the processes tab and search for the bsodm.exe process in the list of processes.

When you have found the process click on it once to select and then click on the End Process button in Windows 7 or the End Task button in Windows 10. The process should now be terminated. Do not close the Task Manager window, though, as we need it for the next step.
Now that the process has been terminated we want to start the Windows Explorer. Most of the time this will cause the Windows desktop to appear, but if not, you will at least be presented with a My Computer folder that you can to navigate the file system and launch applications.
In Task Manager, click on the File menu option and then click on Run. You will now be at the Run dialog as shown in the image below.
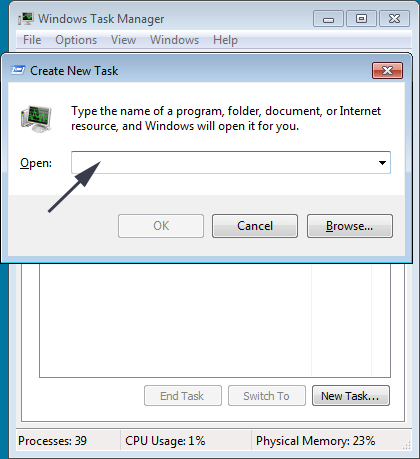
In the Open: field, type explorer.exe and then press the OK button.
Your normal desktop should now appear and you can continue with the rest of the instructions. If the desktop does not appear, then a My Computer window will open that will allow you to navigate the file system to launch programs or delete files.
To terminate any programs that may interfere with the removal process we must first download the Rkill program. Rkill will search your computer for active malware infections and attempt to terminate them so that they wont interfere with the removal process. To do this, please download RKill to your desktop from the following link.

Rkill
When at the download page, click on the Download Now button labeled iExplore.exe. When you are prompted where to save it, please save it on your desktop.
Once it is downloaded, double-click on the iExplore.exe icon in order to automatically attempt to stop any processes associated with Fake Microsoft Security Essentials Tech Support Scam and other malware. Please be patient while the program looks for various malware programs and ends them. When it has finished, the black window will automatically close and a log file will open. Please review the log file and then close so you can continue with the next step. If you have problems running RKill, you can download the other renamed versions of RKill from the rkill download page. All of the files are renamed copies of RKill, which you can try instead. Please note that the download page will open in a new browser window or tab.
Do not reboot your computer after running RKill as the malware programs will start again.
Now please download Emsisoft Anti-Malware, which will scan for and remove any other adware that may have been bundled with this adware. Please download and save the Emsisoft Anti-Malware setup program to your desktop from the link below:

Emsisoft Anti-Malware
The download is fairly large, so please be patient while it downloads.
Once the file has been downloaded, double-click on the EmsisoftAntiMalwareSetup_bc.exe icon to start the program. If Windows Smart Screen issues an alert, please allow it to run anyway.
If the setup program displays an alert about safe mode, please click on the Yes button to continue. You should now see a dialog asking you to agree to a license agreement. Please access the agreement and click on the Install button to continue with the installation.
You will eventually get to a screen asking what type of license you wish to use with Emsisoft Anti-Malware.
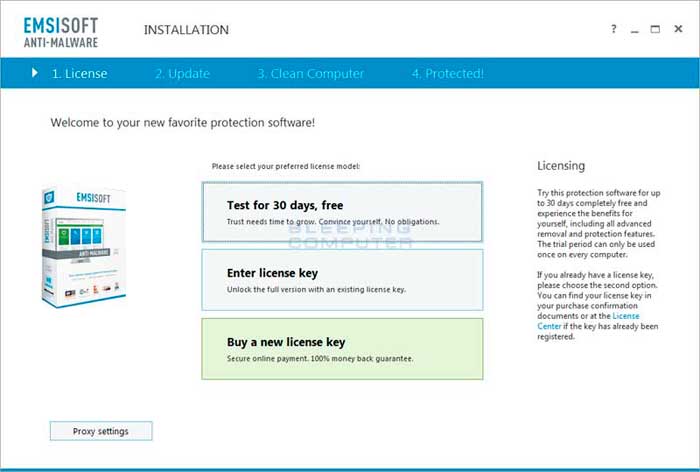
If you have an existing license key or want to buy a new license key, please select the appropriate option. Otherwise, select the Freeware or Test for 30 days, free option. If you receive an alert after clicking this button that your trial has expired, just click on the Yes button to enter freeware mode, which still allows the cleaning of infections.
You will now be at a screen asking if you wish to join Emsisoft's Anti-Malware network. Read the descriptions and select your choice to continue.
Emsisoft Anti-Malware will now begin to update it's virus detections.
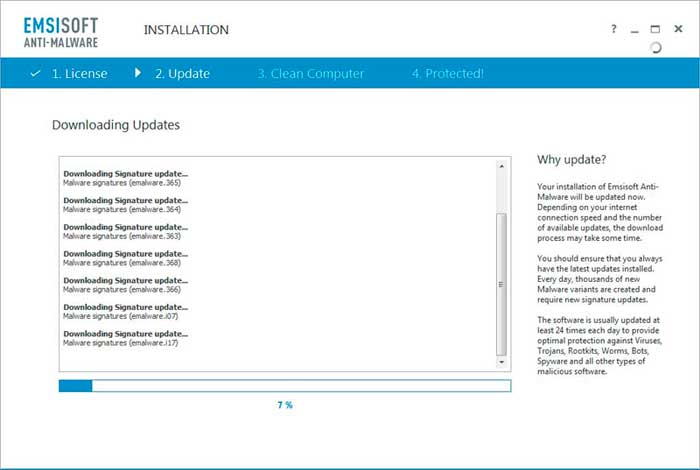
Please be patient as it may take a few minutes for the updates to finish downloading.
When the updates are completed, you will be at a screen asking if you wish to enable PUPs detection. We strongly suggest that you select Enable PUPs Detection to protect your computer from nuisance programs such as toolbars and adware.
You will now be at the final installation screen. Please click on the Finish Installation button end the setup and automatically launch Emsisoft Anti-Malware.
Emsisoft Anti-Malware will now start and display the start screen.
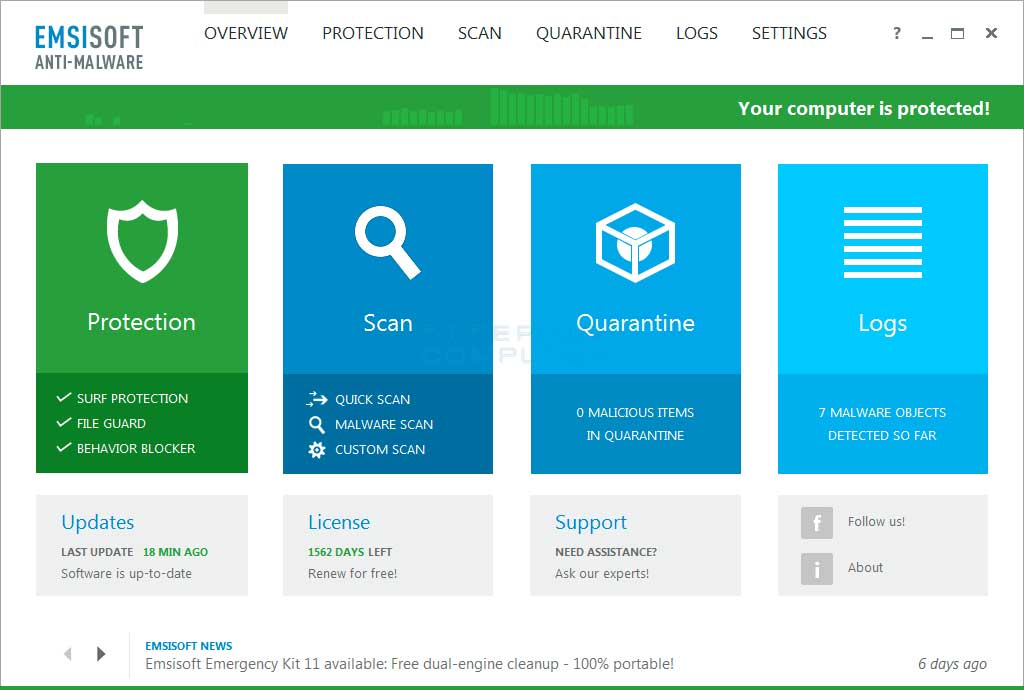
At this screen, please left-click on the Scan section.
You will now be at a screen asking what type of scan you would like to perform.
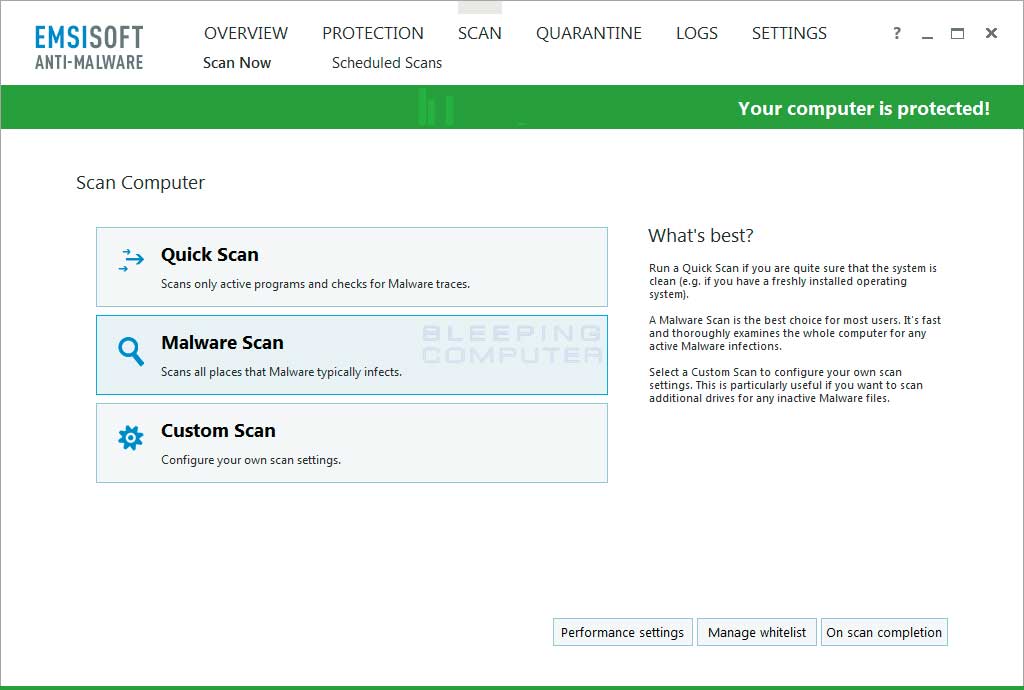
Please select the Malware Scan option to begin scanning your computer for infections. The Malware Scan option will take longer than the Quick Scan, but will also be the most thorough. As you are here to clean infections, it is worth the wait to make sure your computer is properly scanned.
Emsisoft Anti-Malware will now start to scan your computer for rootkits and malware. Please note that the detected infections in the image below may be different than what this guide is for.
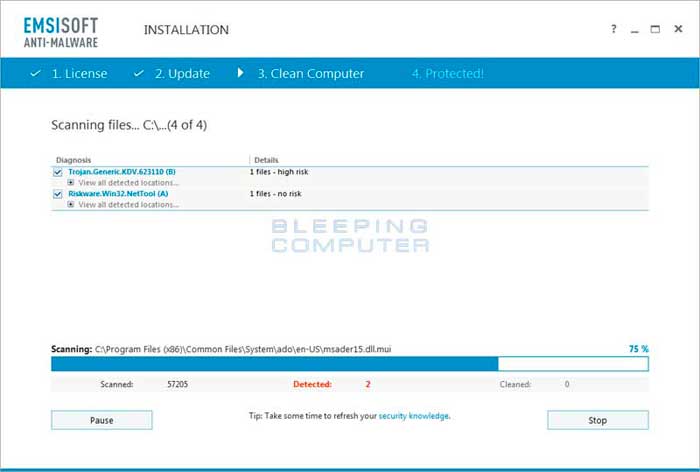
Please be patient while Emsisoft Anti-Malware scans your computer.
When the scan has finished, the program will display the scan results that shows what infections where found. Please note, due to an updated version of Emsisoft Anti-Malware, the screenshot below may look different than the rest of the guide.
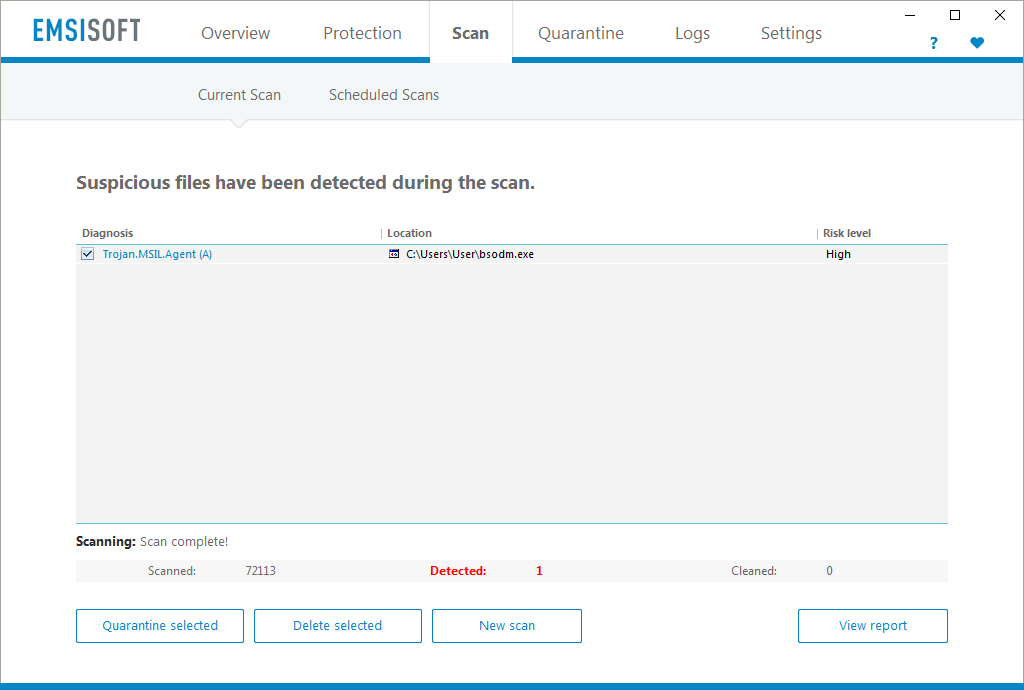
Now click on the Quarantine Selected button, which will remove the infections and place them in the program's quarantine. You will now be at the last screen of the Emsisoft Anti-Malware setup program, which you can close. If Emsisoft prompts you to reboot your computer to finish the clean up process, please allow it to do so. Otherwise you can close the program.
Now please download AdwCleaner and save it to your desktop. AdwCleaner will scan your computer for adware programs that may have been installed on your computer without your knowledge. You can download AdwCleaner from the following URL:

AdwCleaner
When AdwCleaner has finished downloading, please double-click on the AdwCleaner.exe icon that now appears on your desktop. Once you double-click on the icon the AdwCleaner program will open and you will be presented with the program's license agreement. After you read it, click on the I agree button if you wish to continue. Otherwise, click on the I disagree button to close the program. If Windows prompts you as to whether or not you wish to run AdwCleaner, please allow it to run.
If you selected to continue, you will be presented with the start screen as shown below.
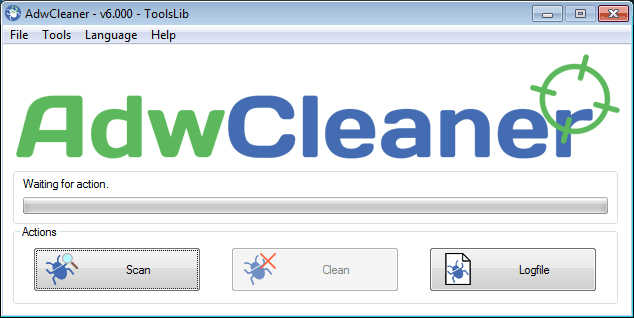
Now click on the Scan button in AdwCleaner. The program will now start to search for known adware programs that may be installed on your computer. When it has finished it will display all of the items it has found in Results section of the screen above. Please look through the results and try to determine if the programs that are listed contain ones that you do not want installed. If you find programs that you need to keep, then uncheck the entries associated with them.
For many people, the contents of the Results section may appear confusing. Unless you see a program name that you know should not be removed,please continue with the next step.
To remove the adware programs that were detected in the previous step, please click on the Clean button on the AdwCleaner screen. AdwCleaner will now prompt you to save any open files or data as the program will need to close any open programs before it starts to clean.
Please save your work and then click on the OK button. AdwCleaner will now delete all detected adware from your computer. When it is done it will display an alert that explains what PUPs (Potentially Unwanted Programs) and Adware are. Please read through this information and then press the OK button. You will now be presented with an alert that states AdwCleaner needs to reboot your computer.
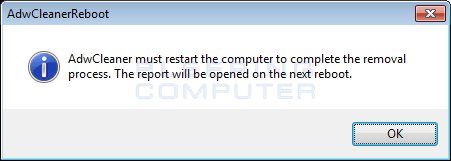
Please click on the OK button to let AdwCleaner reboot your computer.
When your computer reboots and you are logged in, AdwCleaner will automatically open a log file that contains the files, registry keys, and programs that were removed from your computer.
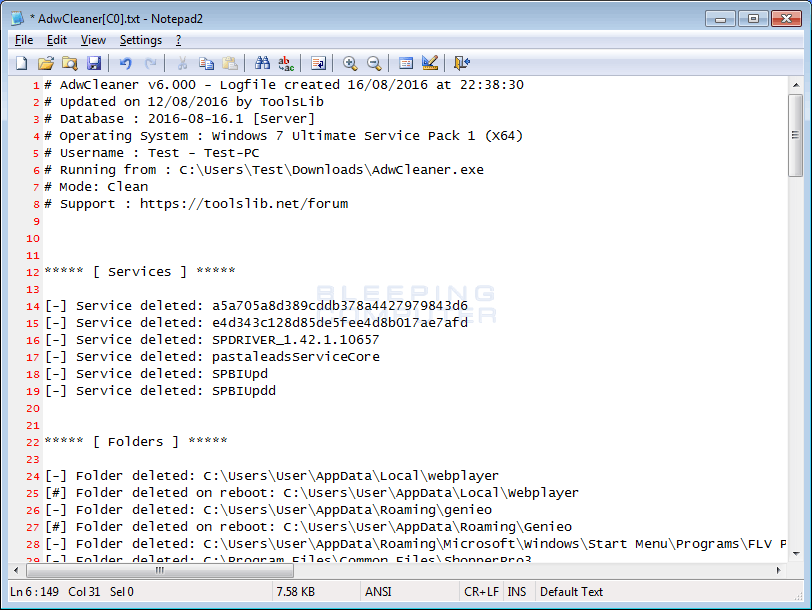
Please review this log file and then close the Notepad Window.
Now you should download HitmanPro from the following location and save it to your desktop:

HitmanPro
When you visit the above page, please download the version that corresponds to the bit-type of the Windows version you are using.
Once downloaded, double-click on the file named HitmanPro.exe (for 32-bit versions of Windows) or HitmanPro_x64.exe (for 64-bit versions of Windows). When the program starts you will be presented with the start screen as shown below.
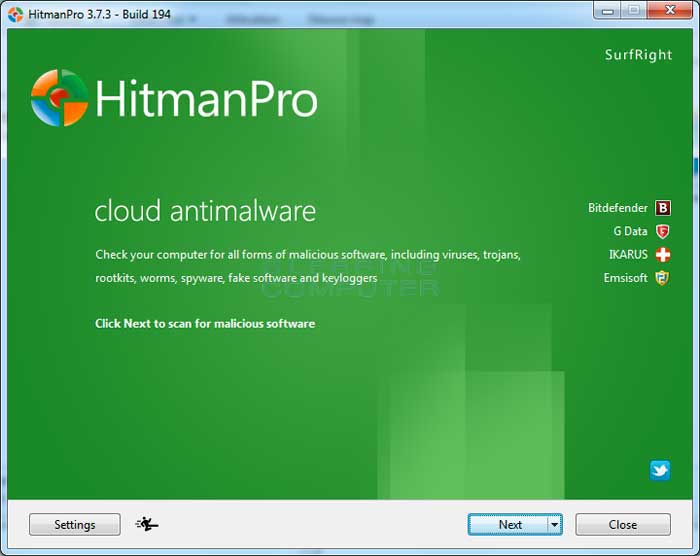
Now click on the Next button to continue with the scan process.
You will now be at the HitmanPro setup screen. If you would like to install the 30 day trial for HitmanPro, select the Yes, create a copy of HitmanPro so I can regularly scan this computer (recommended) option. Otherwise, if you just want to scan the computer this one time, please select the No, I only want to perform a one-time scan to check this computer option.

Once you have selected one of the options, please click on the Next button.
HitmanPro will now begin to scan your computer for infections, adware, and potentially unwanted programs. When it has finished it will display a list of all the items that Hitman has found as shown in the image below. Please note that the items found may be different than what is shown in the image.
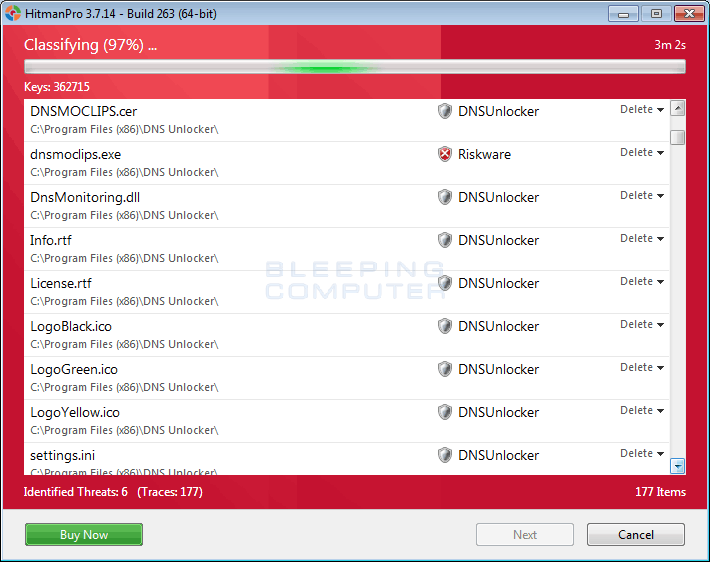
You should now click on the Next button to have HitmanPro remove the detected items. When it is done you will be shown a Removal Results screen that shows the status of the various programs that were removed. At this screen you should click on the Next button and then if prompted you should click on the Reboot button. If HitmanPro does not prompt you to reboot, please just click on the Close button.
Once your computer has has restarted or you pressed the Close button, you should now be at your Windows desktop.
As many malware and unwanted programs are installed through vulnerabilities found in out-dated and insecure programs, it is strongly suggested that you use Secunia PSI to scan for vulnerable programs on your computer. A tutorial on how to use Secunia PSI to scan for vulnerable programs can be found here:
How to detect vulnerable and out-dated programs using Secunia Personal Software Inspector
Your computer should now be free of the Fake Microsoft Security Essentials Tech Support Scam program. If your current security solution allowed this program on your computer, you may want to consider purchasing the full-featured version of Emsisoft Anti-Malware to protect against these types of threats in the future.
If you are still having problems with your computer after completing these instructions, then please follow the steps outlined in the topic linked below:
Preparation Guide For Use Before Using Malware Removal Tools and Requesting Help
Are Your Protected?
While Emsisoft Anti-Malware & HitmanPro will scan and clean a computer for free, the free versions do not offer real-time protection. If you want to be fully protected at all times then it is recommended that you purchase a premium version.

Emsisoft Anti-Malware
Purchase the full-featured version of Emsisoft Anti-Malware, which includes real-time protection and behavior blocker, to protect yourself against these types of threats in the future!

HitmanPro
Purchase the full-featured version of HitmanPro, which includes discover viruses, trojans, rootkits, spyware and other malware on up-to-date and fully protected computers using cloud protection and behavioral detections, to protect yourself against these types of threats in the future!
Disclaimer: While we do earn a commission from the sale of the above products, rest assured we only recommend them due to their effectiveness.