ADVANCED BUILD
UPCYCLED CLASSIC
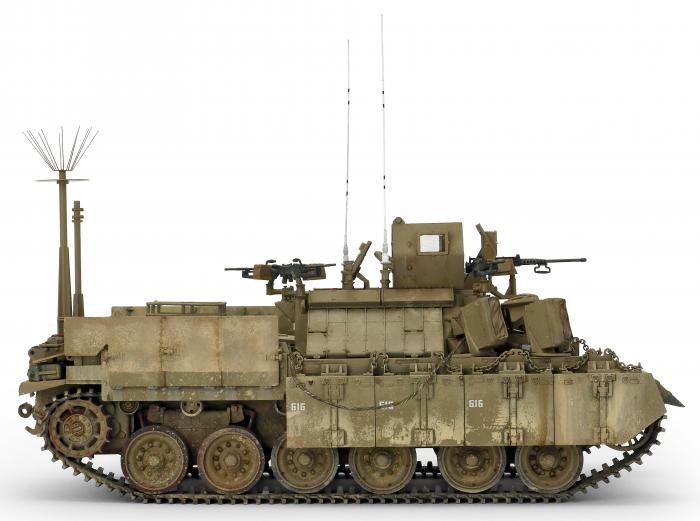
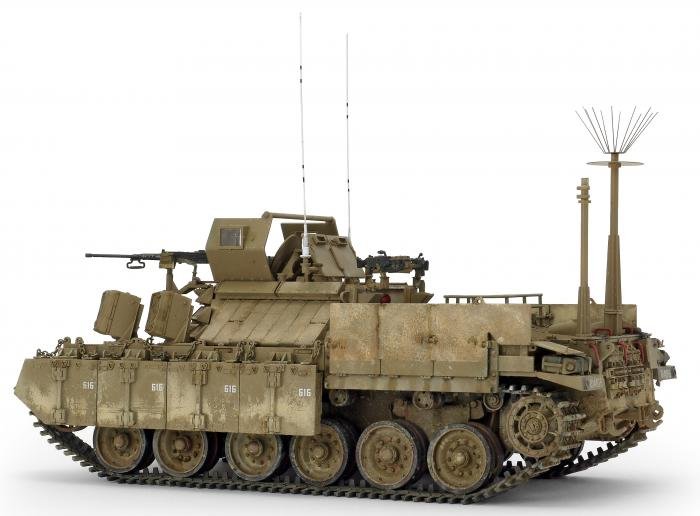
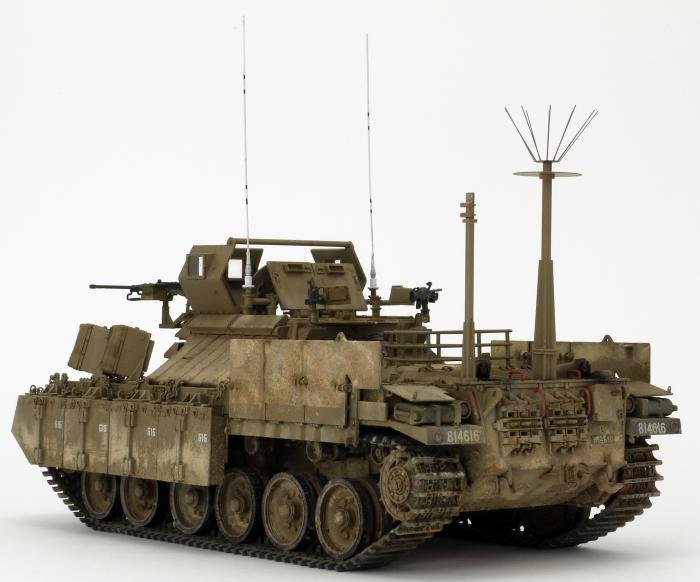
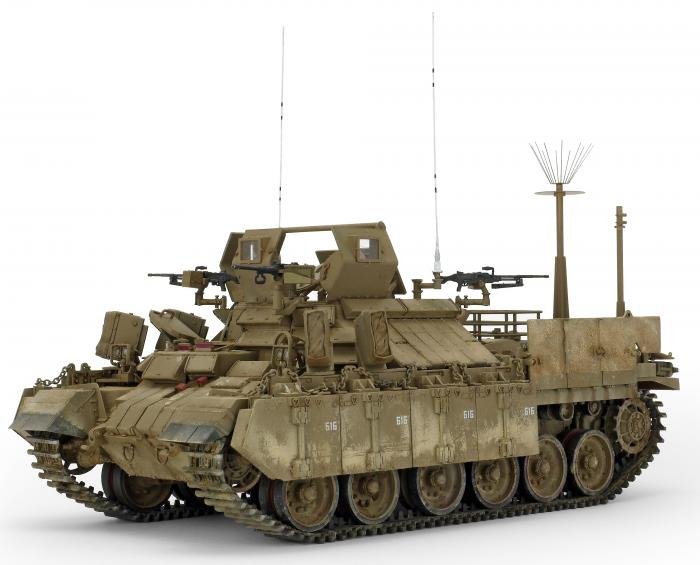
Relative newcomer Tiger Model shows real quality with its 1/35 Nagmachon release. Paul Cawte builds this example of Israeli military ingenuity.
While operating in Southern Lebanon, the Israeli Defence Force (IDF) identified the need for a heavy armoured personnel carrier (APC), with the solution based on the service’s ageing Centurion (Shot-Cal) tanks.
Requirements were drawn in response to the use of improvised explosive devices (IEDs) and anti-tank munitions by opposing forces, which highlighted a discrepancy in both armour and manoeuvrability between tanks and the APCs operating alongside. Luckily, at the same time, the Israeli Armoured Corps was beginning to retire the Shot-Cal and, by simply removing the turret and replacing it with a box-like superstructure and a crew compartment, arrived at a solution to the heavy APC requirement. Even with additional armour, the overall vehicle weight was similar to the standard tank.
The Nagmachon, a portmanteau of the words Nagmash (APC) and Gachon (belly), in reference to the additional underside armour, entered service in the late 1980s. It is capable of carrying ten infantry soldiers and a crew of two. Armed with four 7.62mm FN MAG machine guns or a combination with .50 cal guns and Mk.19 grenade launchers, the Nagmachon is one in a family of successful Centurion-based vehicles. Quite a testament to a tank that entered service with Israeli forces more than 50 years ago.
Above: Decals for the driver’s instrument gauges were sourced from the spares box, the only addition needed to Tiger Models’ excellent interior.
Full to the brim
Although labelled as an early Nagmachon, the model actually represents the second incarnation of the vehicle, as initially the armour panels on the roof were not present. Tiger Model has released two further variants, both of the ‘Doghouse’ variety, which certainly gives a different, if even uglier, look to the vehicle.
MODEL SPEC
| IDF Nagmachon Early Heavy APC | |
|---|---|
| By: | Tiger Model |
| Scale: | 1/35 |
| Stock Code: | 4615 |
| Price: | £72.99 |
| Available from: | Tiger Model stockists |
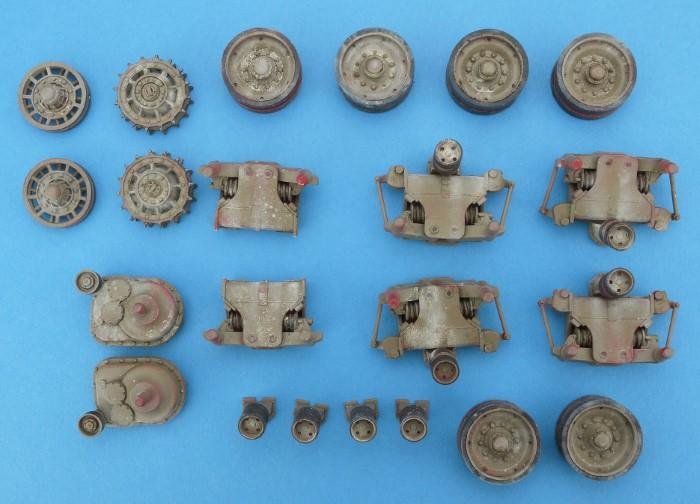
Above: All running gear parts were painted with Halfords Plastic Primer Red before receiving a coat of hairspray. Israeli Sand was then chipped with a cocktail stick. A liberal application of pigments completed the well-used appearance.
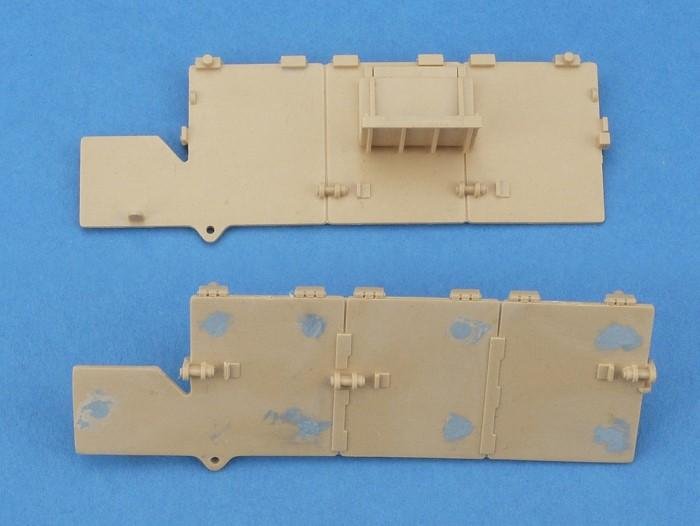
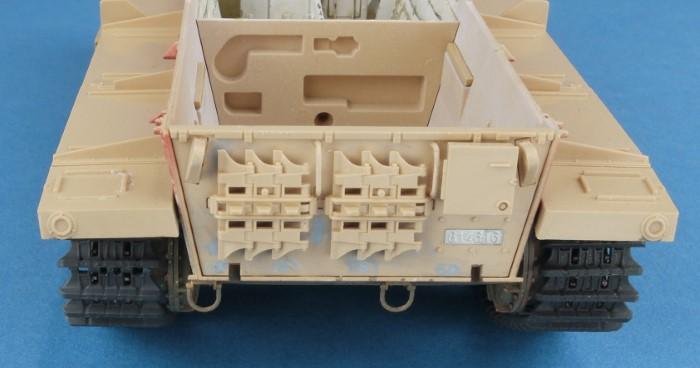
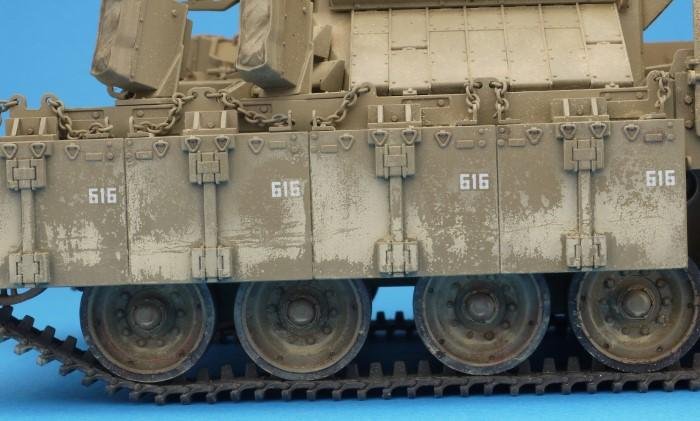
Above: The rear side armour plates displayed prominent ejector pin marks that required filling. On the real vehicle these plates can be raised or lowered – unfortunately, just the former can be modelled out of the box.
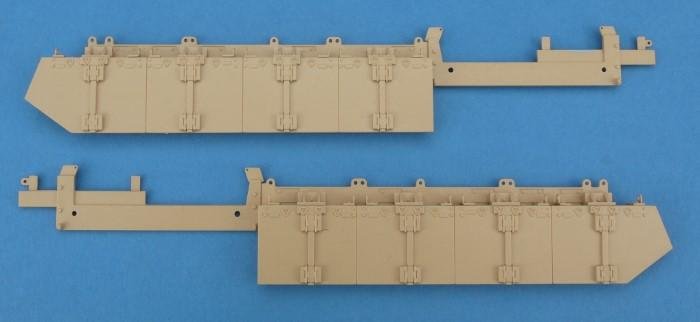
Above: A prominent feature of the Nagmachon is the heavily-armoured side-skirts – the forward panels have been attached to both sides at this stage.
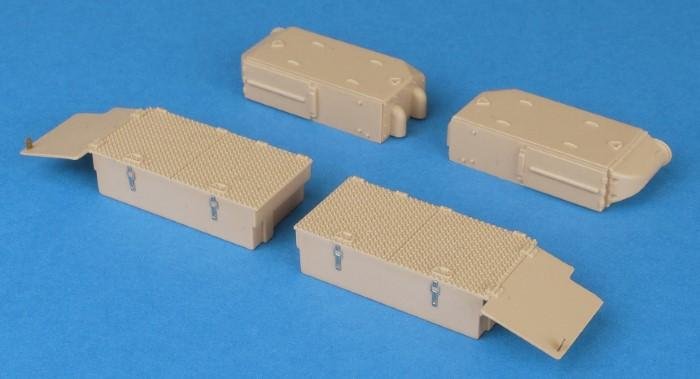
Above: The rear stowage bins benefited from PE clasps, while a lashing point was improved using pieces of scrap brass.
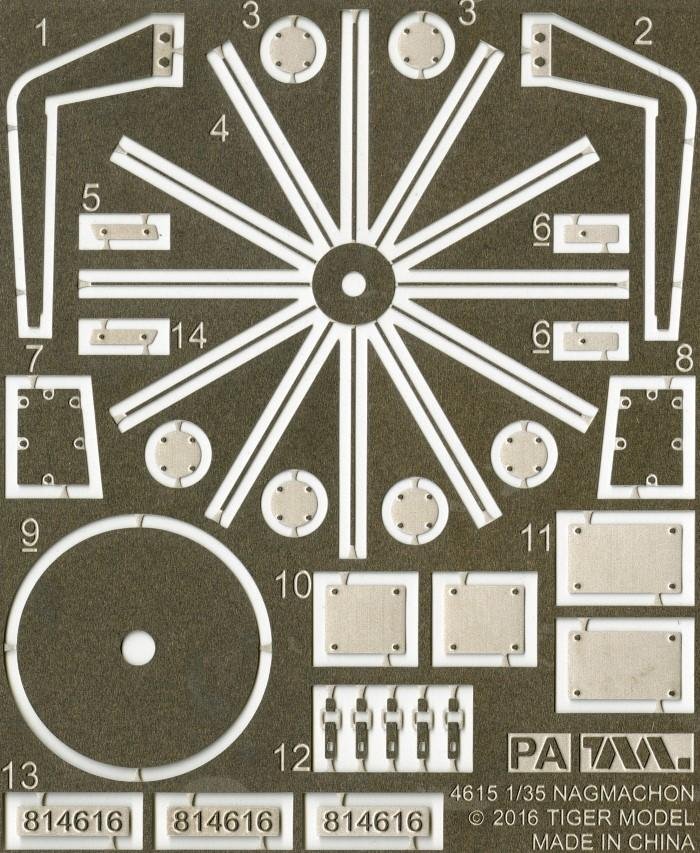
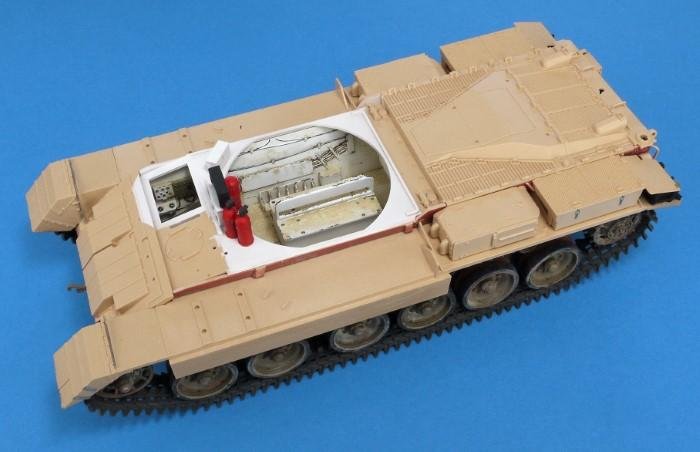
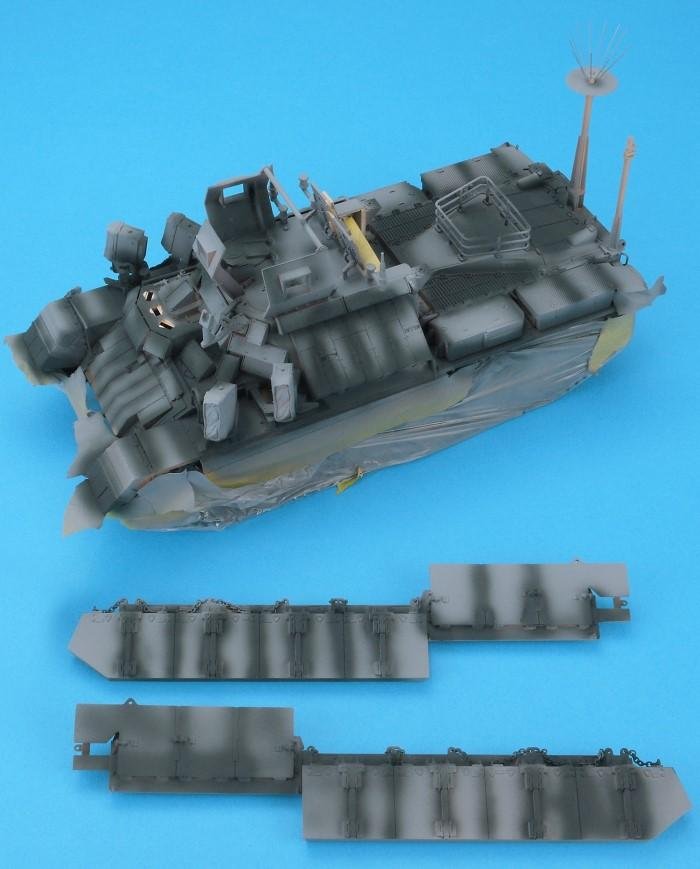
Within the large box was a wealth of plastic: 16 sand-coloured runners, seven black frames for individual-link tracks and a further three in transparent hues (clear, purple and blue) containing the bullet-proof glass and vision blocks. Individual cellophane bags contained the lower hull, upper superstructure – referred to as the ‘turret’ – and a small decal sheet, labels to attach to runners, brass chain, a photo-etched (PE) metal fret, poly-caps and a metal towing cable. Additionally, there were rubber tyres and an A4 painting reference, with colours matched to both AMMO-MIG (www.migjimenez.com) and Tamiya (www.hobbyco.net) products.
Tiger Model’s instruction booklet really reminded this modeller of a Tamiya offering, featuring the identical style of a black and white cut-out image of the box art and subsequent easy-to-follow construction diagrams – they just needed a cartoon Israeli crewman inside to complete the look. The Tamiya similarity also extended to the level of detail present and general quality of the model; can there be a greater compliment?
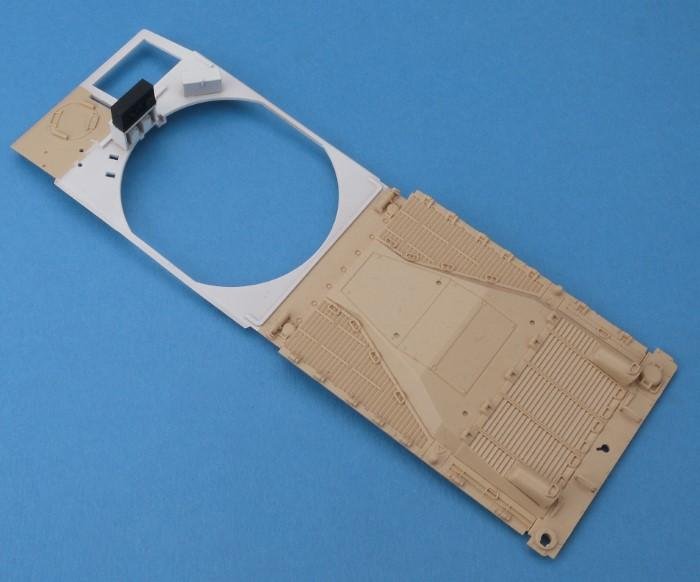
Above: Matt white was required on a portion of the upper hull because, due to the new superstructure, this would later form part of the interior.
Above: A test-fit revealed the hull wouldn’t come together neatly, so a thin strip (marked on the left) was removed from the edge of part M21, after which the glacis plate joined perfectly.
Above: Spare track and other parts were fitted onto the rear hull panel. A few patches of filler were required to remove location points for other variants – note the tracks were fitted out of sequence as they would otherwise be awkward to install once the track guards were attached.
Above: With the upper hull, track guards, rear panel and front glacis plate all in place, several components were then added to the vehicle hull, some of which later formed part of the interior, so required painting accordingly.
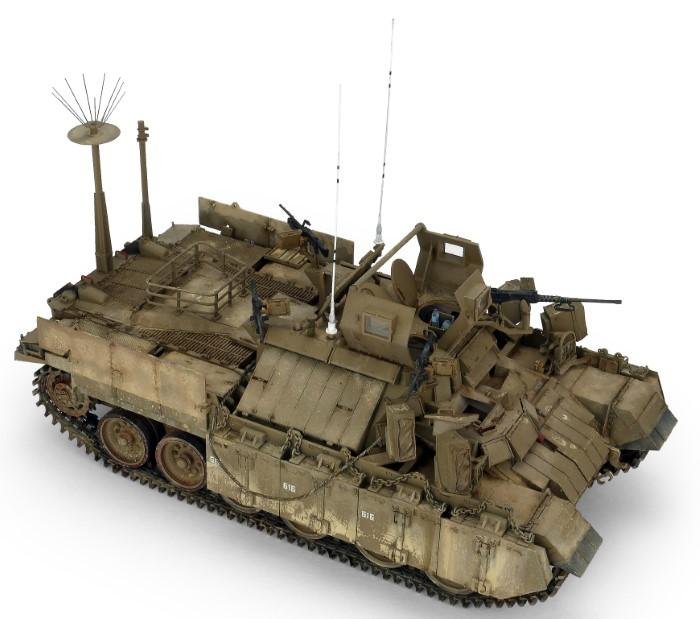
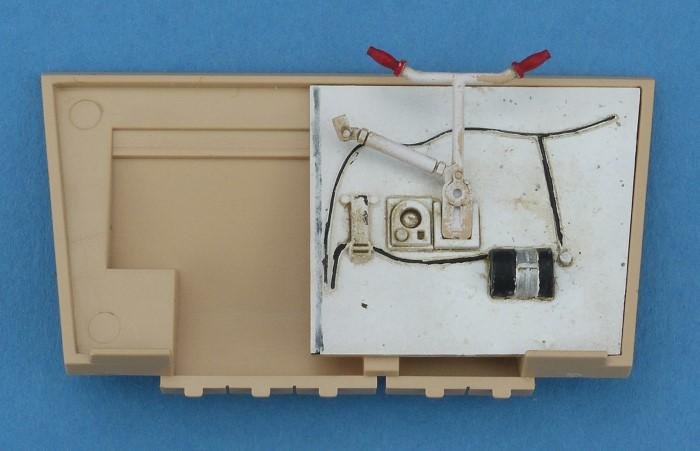
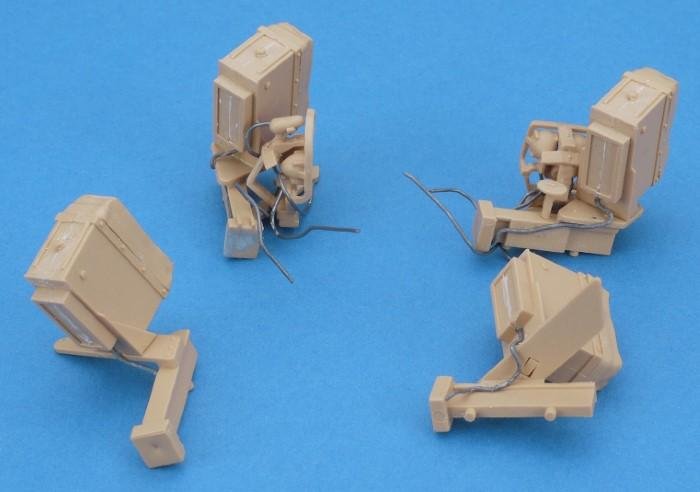
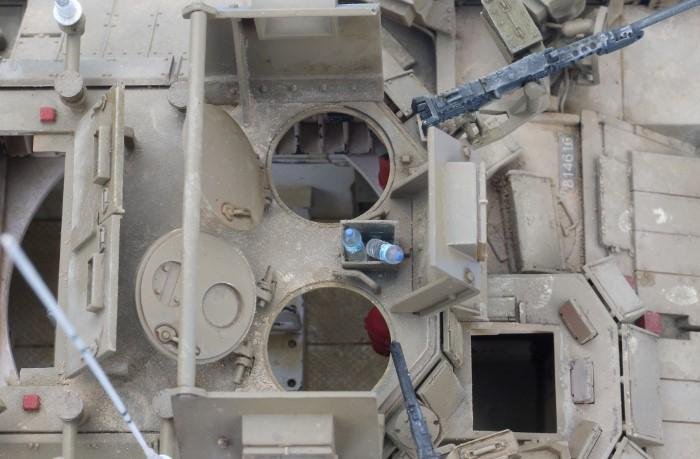
The model featured a fully detailed interior crew compartment and driver’s position, which would be particularly visible on completion due to the large access hatches at the rear. It was here that construction began. With the excellent Desert Eagle Nagmachon volume as a reference throughout the build, interior parts were identified and given a coat of matt white. Photographs showed the interior to be a weathering enthusiasts’ dream, covered in chips and scratches, paint runs and every horizontal surface featuring a thick coating of Negev desert! Therefore, many fun-filled hours were to be had painting fine details, adding scratches and applying washes and pigment powders.
The only addition made to the kit interior was attaching instrument gauge decals to the driver's panel (part N3). The lack of these was a glaring omission, as the panel was quite visible when looking through the driver’s hatch.
Why rubber tyres?
For some reason Tiger Model supplied the road wheels with rubber tyres that included a section of the wheel’s outer rim. Nagmachon photos reveal the tyres are particularly vulnerable to damage, which it was hoped could be replicated. The rubber had other ideas, though, seemingly able to self-heal when cut with a scalpel and to flex away from any sanding stick – this, coupled with a reluctance to be too rough with them, shelved those plans. Even after painting, any slight movement resulted in fine cracks on the surface.
Annoyingly, following the build, a company coincidentally called Tiger Model Design was discovered, which manufactured the ideal resin replacement: 35-8901 Distressed Road Wheels for Israeli Centurions, and these depicted the desired appearance. Once all the running gear components were assembled, they were painted and weathered, as it was reasoned these parts would be difficult to access once the side armour was in place.
All components received a base coat of Halfords Plastic Primer Red (www.halfords.com), then the hairspray technique was used to create chips and worn areas in the Israeli Sand Grey finish. A liberal application of pigments completed a well-used appearance. The lower rear hull plate received details including PE parts, which were numbered incorrectly on the instructions, but due to their shapes it was obvious which item went where.
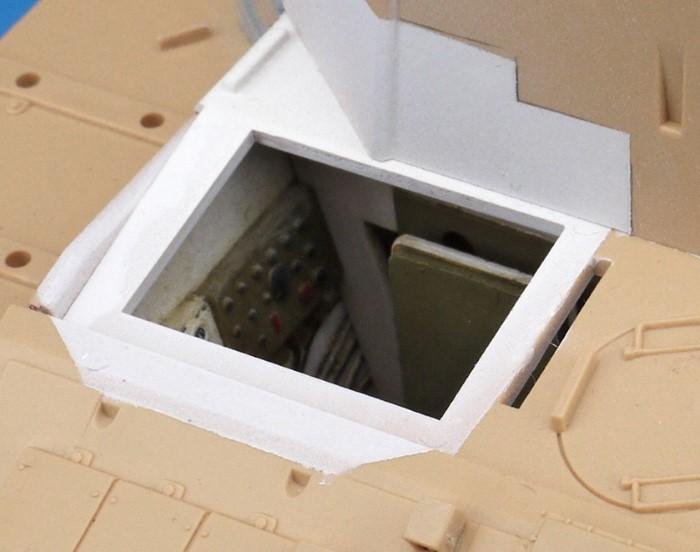
Above: Once satisfied with the superstructure’s attachment, a dry-fit of the driver’s hatch revealed that yet more matt white was required.
Well protected
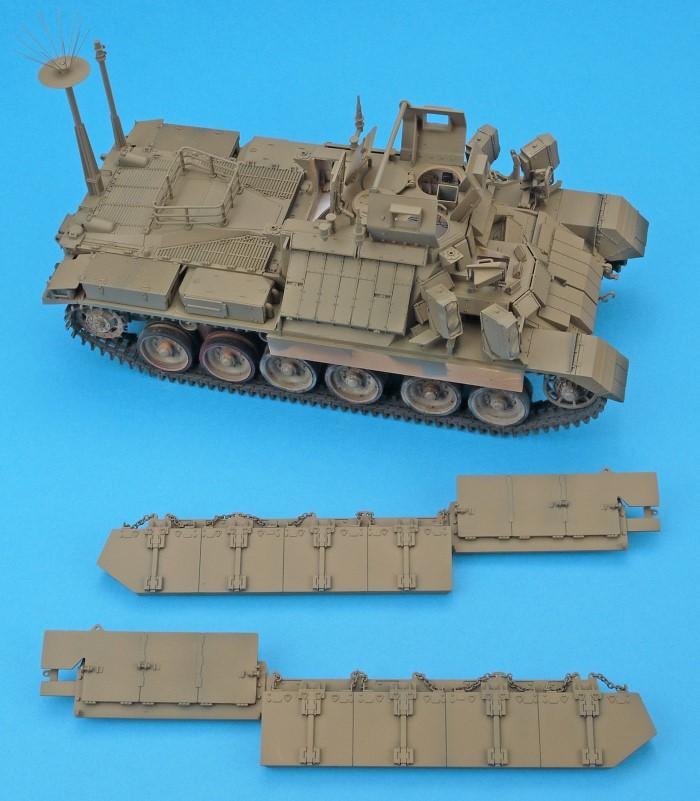
One of the Nagmachon’s most distinctive features is the armoured side-skirts consisting of eight heavy-duty, thick Explosive Reactive Armour (ERA) panels at the front and three thinner items at the rear. The latter are hinged and, when raised, provide protection for crews dismounting or a stretcher laid on the rear engine deck. Tiger Model sensibly divided these into two sections that attached to a console beam, a metal structure that runs the length of the vehicle.
Unfortunately, the thinner rear panels could only be fitted in the raised position and suffered from prominent ejector pin marks. A climbing step used by crews when the side panels are lowered was also attached, however this isn’t always present and, even then, occasionally just on one side. Several lashing points represented by solid plastic were drilled for a more refined appearance. Parts Q6-Q9 represent the leaf springs attached to the console beam via small chains, onto which the armoured panels are then hung – this can result in panels hanging unevenly on the real vehicle.
Above: Wiring for the smoke grenade launchers was added using lead wire; this material was easy to bend to the required shapes.
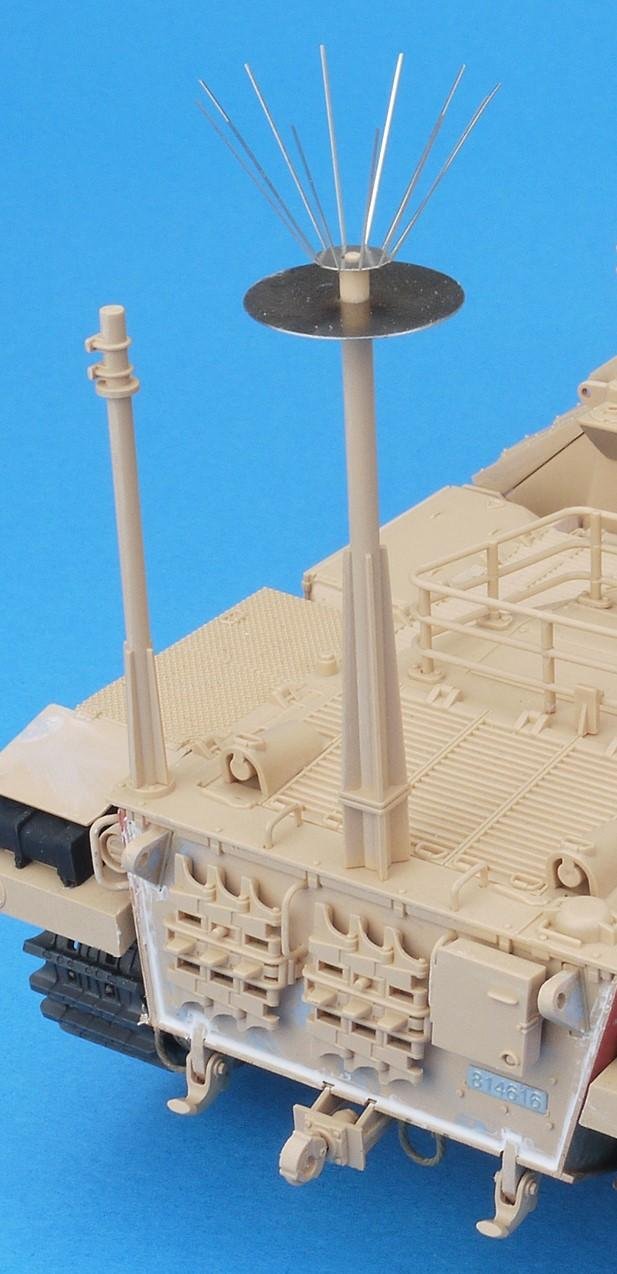
Above: Thin aerials at the top of the large ‘Shalgon’ jammer antenna needed careful folding to the required angles.
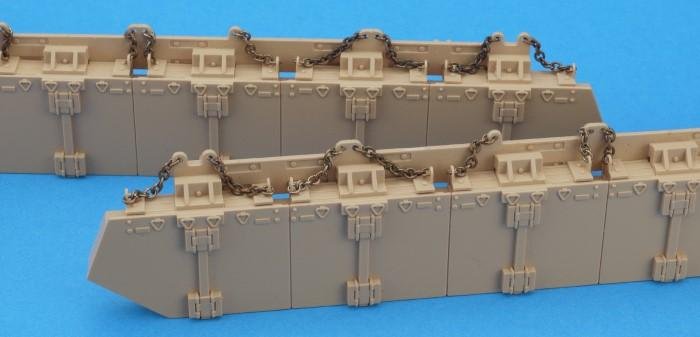
Above: Lengths of chain attach the ERA blocks to the console beam but, unfortunately, Tiger Model gave no indication of the length of each section.
Above: After applying a primer to highlight any imperfections and provide a solid foundation for paint layers, the model was pre-shaded to define panel lines and areas of shadow.
The instructions suggest lengths of chain are cut and attached using pliers at the end of the build, but gave no indication of how long each section should be. After careful study of reference photos, the lengths (in links) used were as follows (from front to rear): nine, ten, nine, ten, eight, five, five and five. The side-skirts were then set aside and attached after painting. Note: if nit-picking, the chain’s final link should actually be a shackle, but having to scratch-build 32 of these was a step too far!
The next stages covered attaching the mud flaps to the track guards, plus building the air cleaner and stowage bins for the rear hull. Again, a lashing point was improved on this occasion with scrap brass. Spare track and other parts were fitted onto the rear hull panel, while filler neatened those location points required for other variants.
The upper hull, track guards, rear panel and front glacis plate were then attached to the chassis. It was here that the only major fitting issue was encountered – after considerable head-scratching, this was revealed to be the rear section of the glacis plate fouling the right-hand driver’s compartment wall. The remedy was to remove a thin strip from the edge of part M2, after which everything slotted in place. At this point, the instruction sequence was ignored to construct the tracks, rather than struggle to fit them on after the guards were in place.
The individual links required minimal clean-up, with no dreaded ejector marks present. Lengths of assembled tracks were moulded around the drive sprockets and idlers, after which they were held in place with Tamiya tape and left to dry fully.
After painting with Tamiya XF-84 Dark Iron, they were re-attached to the tank and the guards installed. Several components were then added to the vehicle hull, some of which later formed part of the interior, so required painting accordingly. The red elements of the fire suppression system created a pleasing splash of colour inside.
Up on top
Four roof-mounted weapons were supplied: three 7.6mm FN MAGs and one .50 cal machine gun. Once assembled, these were painted matt black, then coated with a thinned wash of burnt umber oil paint. These were also set aside until final assembly and painting of the tank was completed.
Turret hatches can be constructed open or closed. Oddly, if laid flat on the roof, they would overlap one another – rather awkward if wishing to close them in an emergency – but it couldn’t be determined if this was accurate, so both were glued upright. Moulded counterbalance springs were drilled, which created a more three-dimensional appearance. The roof mounted ammunition rack was also modified to represent it being empty. Interior detail inside the ‘turret’ is excellent, largely consisting of two wall sections that were painted at the beginning of the build, along with the other internal parts.
Above: The next stage was to build the Xtracrylix XA1810 Israeli Tank Sand Grey tone in a series of light layers, which allowed the pre-shade to remain visible.
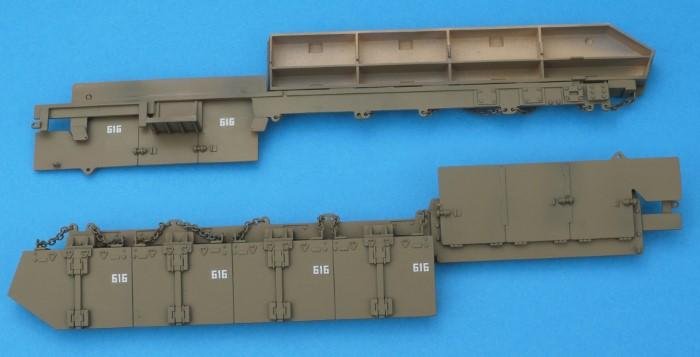
Above: Decals were provided for each armour segment. On the real vehicle their location varies, being painted depending on whether the panels were raised or lowered, so several items were placed upside down on the ‘inner’ faces.
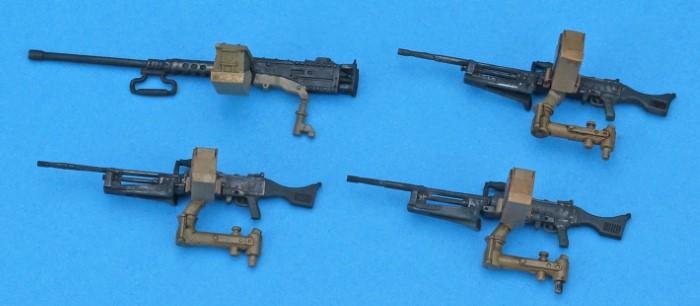
Above: Three 7.62mm FN MAGs and one .50 cal were supplied. These were painted matt black followed by a thinned wash of burnt umber oil.
Fitting the ‘turret’ to the hull proved a little fiddly, taking several attempts to position – a small amount of filler was needed around the bottom edge. The roof section also created a seam that needed filling, a consequence of maximising moulds for other variants. Care had to be taken when removing the parts for the tubular stowage cage that sits on the rear hull, as these could easily be broken. Photos imply Tiger Model’s location is not exactly accurate but moving the cage forward the required few millimetres would necessitate a reworking of its entire shape. Several attachment bolts were also left off, in accordance with reference photos.
Above: Heavy Chipping Fluid was used on the side-skirts to create the effect of worn-away dust and dirt. Pigments and oil paint created rain marks and splashes.

Above: The lower edge of the side panels was masked to create a distinct line where they had previously rested against the vehicle side necessitate a reworking of its entire shape. Several attachment bolts were also left off, in accordance with reference photos.
External protection
A few of the distinctive ERA tiles were then fitted to the front hull, along with the previously assembled driver’s hatch. It was noticed that a small section of the exterior would be visible through the latter, so it would need a coat of matt white to represent the interior surfaces.
The roof-mounted armoured plates had ejector-pin marks on the inner faces, which required neatening. Tiger Model doesn’t specify which glazing parts to use for the armoured glass and reference photos aren’t conclusive, with some showing a distinctive blue hue over time, while the others were clear. In this instance, the latter parts were chosen.
Construction essentially then worked from left to right, following similar steps of attaching the headlight clusters, smoke grenade launchers and side ERA panels. Wiring was added to all lights and grenade launchers using lead wire. The wire rope supplied was difficult to manipulate – in the end, just one was fitted – as they did not seem to be carried regularly. Brass parts were used to replicate the fine aerials at the top of the large ‘Shalgon’ jammer antenna and these needed careful folding to the required angles.
Painting/decorating
Following a coat of primer and a pre-shade, the model was airbrushed in its entirety with Xtracrylix XA1810 Israeli Tank Sand Grey (www.hannants.co.uk).
Once dry, smaller details (such as headlights and mud flaps) were then coloured. A distinctive feature of Israeli vehicles has always been the red painted handrails, but reference photos show this is not always the case, often being black or the body shade. That said, red gives more visual interest, so was used on the rear handrails. Incidentally, the inside of the large crew access hatches can be either sand grey or white.
Markings for just a single vehicle are provided and these consist solely of tactical numbers, present at various locations on the vehicle. Tiger Model specified placing a decal on the front mud flap, but instead this was relocated to the rear, as references suggest that numbers are often carried on both sides at the rear, but only rarely at the front.
Number decals are also provided for each segment of side armour. These are not always visible on the real vehicle, but when they are, their location on the rear segments varies. This implied they were painted on the outer facing panel regardless of whether the panels were raised or lowered at the time. To replicate this, the decals were placed upside down on the ‘inside’ faces of the panels. The familiar Israeli black-and-white-painted registration plates were provided as both decal and PE components and it was decided to place the former over the latter and ‘bed’ them down with decal softener. Side-skirts and defensive armaments were then attached.

Desert patina
The Nagmachon is a great basis for weathering techniques as it has a wealth of raised detail and a variety of surface textures, added to which the real vehicles are often incredibly dirty. Beginning with a dark brown pin wash to highlight panel lines and bolt heads, the model was then covered with AK Interactive’s AK147 Middle East Soil pigment (www.ak-interactive.com), paying close attention to reference photographs throughout. A small number of chips and scratches were added using a sponge, prior to several more layers of pigments (applied both wet and dry) and oil paint washes, which were built up slowly over several sessions.
AK Interactive AK089 Heavy Chipping Fluid was used on the side-skirts to create the effect of abraded dust and dirt. This was the first time I had used this product and I was very pleased with the results.
As mentioned earlier, the rear plates can be positioned up or down, so it was decided to apply a thick pigment layer to the side which (when lowered) would face the running gear, creating a narrative that they had been raised recently. The lower edge was masked to establish a distinct line where the panels had previously rested against the vehicle side. It is also important to remember to weather the ‘inside’ of these panels.
Plaster was added to the pigments to simulate a thicker mud layer, and this was applied to some of the lower vehicle sections. Silver marker pen was used on the edges of the tracks and, completing the build, water bottles were added to the roof, plus brass rod aerials.
Armoured ‘taxi’
Israeli military vehicles are always interesting subjects as they are all born out of battlefield experience, resulting in unusual designs and often reusing older examples. The harsh desert environments in which they operate also give weathering fans an opportunity to really let loose in creating wear effects. Tiger Model has released a beautiful model that was straightforward to build and has excellent levels of detail throughout. Early Nagmachons are often seen with a canvas sunshade known as the Shimshonit shelter – something to perhaps hope for from aftermarket manufacturers?
Above: Paint chips and boot prints were added around crew access points, after which wire aerials and water bottles from the spares box finished the build.
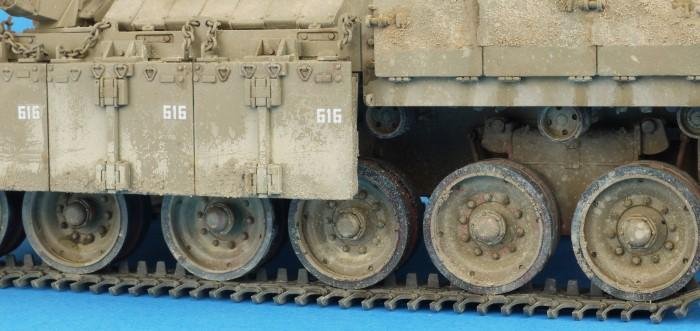
Above: Silver marker pen was used to highlight the track treads, while different weathering techniques on the ERA panels, wheels and raised side-skirts helped to create a visually interesting finish.
REFERENCES
Modern Israeli Tanks and Infantry Carriers 1985-2004, by Marsh Gelbert (Osprey), ISBN: 978-1-84176-79-2
Nagmachon Heavy APC: Centurion Baed APC in IDF Service - Part 2, by Michael Mass and Adam O'Brien (Desert Eagle), ISBN: 978-9-657700-01-3