7 steps to making a prototype and supercharging your product design
Hello and welcome to the latest edition of Beyond The Surface, the newsletter that helps you turn your ideas into reality. In this edition, we will cover how to create a working prototype in 7 steps, and what are the benefits of using a prototype for your product development.
Prototypes and why we need them
A prototype is a preliminary version of your product that you can use to test its functionality, design, and feasibility. Creating a prototype can help you refine your product before investing in production, marketing, and distribution. Prototyping is considered a vital and essential step in the product development process for its numerous benefits.
Prototypes allow the creators to test and validate their ideas in the real world. Prototypes can help to check the functionality, usability, feasibility, and desirability of a product before investing in mass production. Prototypes can also help to communicate the product idea to potential customers, investors, partners, or media, and solicit feedback and suggestions for improvement. Prototypes can also help to determine the best materials, components, and techniques to use for the final product. Prototypes can vary in their level of fidelity and detail, depending on the purpose and stage of the product development process
Here are the 7 steps to create a working prototype for your product:
1. Conduct research
Before you start designing your prototype, you need to do some research on your target market, competitors, customer needs, and industry trends. This will help you identify the problem you are solving, the value proposition of your product, and the features and specifications you need to include. Read how we conducted extensive research to understand the users of Bloom - wireless charger, designed by Analogy for Eurotronic. Research can be conducted by studying the market and market trends, analyzing user behaviour and looking at past performance of similar ideas and products. There are a multitude of research methodologies that we employ at Analogy - demographic and psychographic segmentation, user studies and surveys, empathy mapping, competitor research, product breakdowns, etc. These research techniques help the team at Analogy finalize the product prototype requirements.

2. Draw a design
It is often said that a picture is worth a thousand words. We believe this is quite true when it comes to industrial design and prototyping. The next step is to sketch out your product idea on paper or on a digital tool. You don’t need to be an expert artist, just draw the basic shape, dimensions, and components of your product. This will help you visualize how your product will look like and how it will work.
A simple hand drawn sketch describing the visuals of a product prototype from 2-3 angles can help you anticipate and solve numerous problems in prototype development, well in advance. Quite often, we begin our projects' ideation phase by simply sketching on post it notes or A5 sheets. For projects like iDiya, the sketching phase was quite extensive since the form of the product had rotational symmetry. Read about our design and prototyping process for iDiya.

3. Develop a virtual model
Once you have a rough sketch of your product, you can use a software tool to create a 3D model of your product. This will allow you to see your product from different angles, add colors and textures, and make adjustments as needed. You can also use a simulation tool to test how your product will perform under different conditions and scenarios.
3D tools like SolidWorks, Fusion 360 and Rhinoceros 3D are quite helpful for developing 3D CAD models of your product. Each of these tools have their own strengths and weaknesses and your choice of tool will depend on multiple factors - where you are in the prototype development process, amount of versatility needed in the model, who is using the virtual model and what it is being used for. Our work for Cellairis designing rugged iPhone cases involved a lot of CAD modelling, which later helped out our clients by reducing their tooling cost by 60% with a 40% increase in impact protection. Click here to see how we achieved these results for our client.

4. Determine whether you require assistance
Depending on the complexity and scope of your product, you may need some help from experts or professionals to create your prototype. For example, you may need an engineer to help you with the technical aspects, a designer to help you with the aesthetics, or a manufacturer to help you with the materials and production. You can also use online platforms or services to find freelancers or collaborators who can assist you with your project.

Using our multiple models of engagement, Analogy works with the largest and smallest companies, providing them with tailored assistance to reach their product and prototype goals. We work with recently incorporated startups headed by enthusiastic first time founders, as well as large Fortune 500 companies with global teams and multiple business units. Shoot an email to business@analogydesign.co to explore how we can help you design products and create compelling prototypes for stakeholder buy-in.
5. Generate a proof of concept
A proof of concept is a simple demonstration that shows that your product idea is feasible and viable. It can be a video, a presentation, or a prototype that showcases the core functionality and value of your product. A proof of concept can help you validate your assumptions, get feedback from potential customers or stakeholders, and attract investors or partners.
Remember that a proof of concept is just that, a proof of your product's concept. It isn't supposed to be the final product or the fully functional prototype. Many inventors get caught up in the endless cycle of trying to perfect the Proof of Concept. What they forget is that multiple such models can be build to showcase and test various different functionalities and aspects of the products' design.
While designing the employee onboarding kits for Maersk, we developed multiple Proofs of Concepts to validate the size, items, graphics and textures. Here's how we did it for Maersk.
One model could validate the size and scale of the product, another could demonstrate the core functionality while a third could be a purely aesthetic model showcasing the paint and finish scheme of the product.


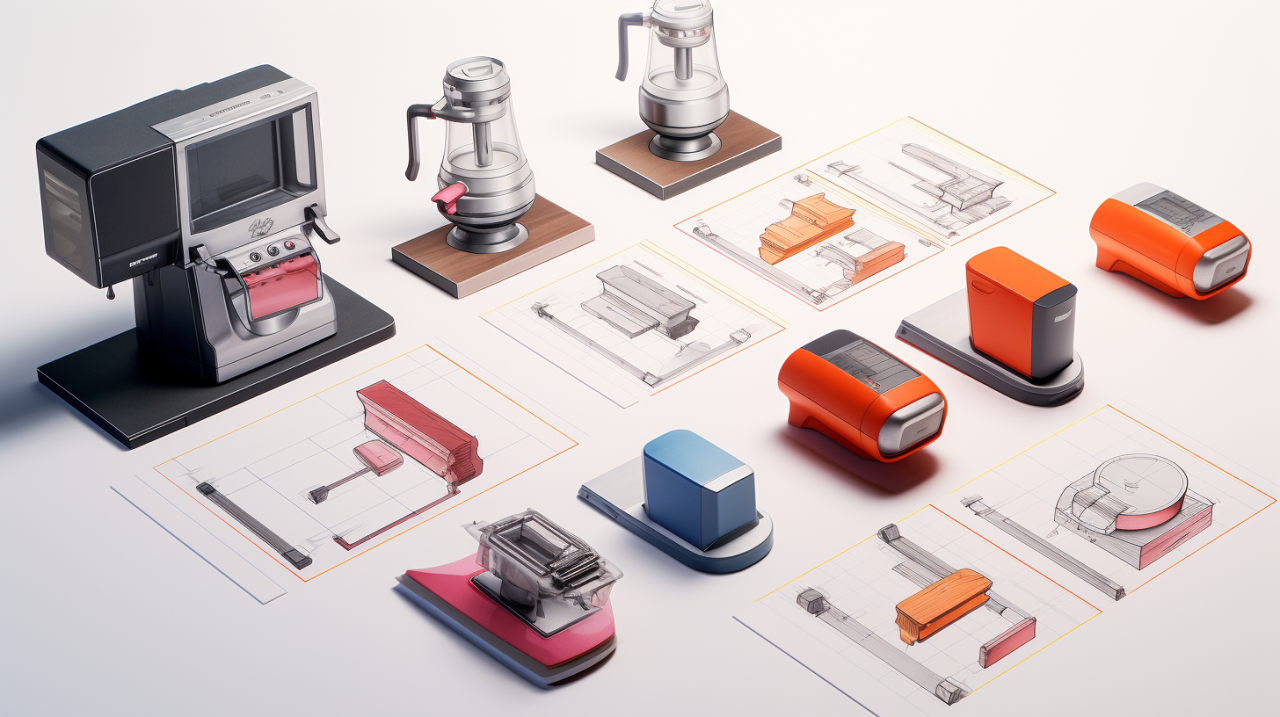
6. Create your prototype
After you have validated your proof of concept, you can start creating your actual prototype. There are different types of prototypes that vary in their level of fidelity and detail. You can choose the type that best suits your needs and budget. Some common types are:
Paper prototype: A low-fidelity prototype that uses paper or cardboard to represent the physical appearance and interaction of your product. It is cheap and easy to make, but it has limited functionality and realism.
Digital prototype: A medium-fidelity prototype that uses software tools to create an interactive simulation of your product. It is more realistic and functional than a paper prototype, but it may not reflect the actual look and feel of your product. Digital prototypes are used extensively to run through apps, websites and other digital products. Read about how we built prototypes of an AI powered camera fitness tracking app for our clients.
Low fidelity prototypes are quick and simple versions of a product that are used to test core functionality and user flows. They are usually created early on in the design process and don’t require a lot of time or resources to produce. Low fidelity prototypes can be either hand-drawn sketches or basic digital wireframes without color or content.These low-tech designs allow UX designers to visualize each screen’s layout, test navigation, and experience user flows. Low fidelity prototypes are useful for gathering feedback on basic structural elements, such as information architecture, hierarchy, and content placement, without the potential distraction of visual design factors like colors and typefaces.
High fidelity prototypes are much more detailed versions of a product that closely resemble the final user experience. They are usually created later on in the design process, once the core functionality and user journeys have been validated with low fidelity prototypes. Creating high fidelity prototypes usually requires more time and resources than low fidelity ones. High fidelity prototypes can be created using software tools that allow designers to add colors, content, images, icons, fonts, and interactivity to their wireframes. These high-tech designs allow UX designers to test visual design ideas and get buy-in from stakeholders. They are also very useful for conducting user research sessions like usability testing, providing a more true-to-life scenario than low fidelity can offer.
Physical prototype: A high-fidelity prototype that uses materials and components that are similar or identical to those of your final product. It is the most realistic and functional type of prototype, but it is also the most expensive and time-consuming to make.

7. Repeat any steps as needed
Creating a prototype is an iterative process that requires testing, evaluation, and improvement. You should test your prototype with real users or customers, collect feedback, measure results, and identify areas for improvement. You should then make changes to your design or functionality based on the feedback and test again until you are satisfied with your prototype. Read about how we approach iterative prototyping and design process at Analogy.
What are the benefits of using a prototype?
Creating a prototype can offer many benefits for your product development process, such as:
Tests your product’s functionality: A prototype can help you check whether your product works as intended and meets the needs and expectations of your customers. You can also identify any errors or flaws in your design or functionality and fix them before they become costly or irreversible.

Saves money before production: A prototype can help you avoid wasting money on producing a product that may not work well or sell well. You can also use a prototype to estimate the cost of production, materials, labor, and distribution for your final product. Read how we used prototyping methodologies for designing a wireless car charger for Cellairis.

Allows you to demonstrate your product to investors: A prototype can help you showcase your product idea to potential investors or partners who may be interested in funding or supporting your project. A prototype can also help you prove the feasibility and viability of your product and increase your credibility and confidence.
Determines your product’s usefulness: A prototype can help you test whether your product solves a real problem or adds value to your customers. You can also use a prototype to measure the demand and market potential of your product and adjust your strategy accordingly.

Highlights the proper materials to use: A prototype can help you determine the best materials and components to use for your final product. You can also use a prototype to test the durability, quality, and safety of your product and ensure that it meets the standards and regulations of your industry.

Helps you coherently discuss your product: A prototype can help you communicate your product idea clearly and effectively to different audiences, such as customers, investors, partners, or media. You can also use a prototype to solicit feedback, suggestions, or opinions from others and incorporate them into your product development.
Conclusion
Creating a working prototype is an essential step in developing a successful product. It can help you test, validate, improve, and present your product idea in a realistic and tangible way. By following the 7 steps outlined in this newsletter, you can create a working prototype that will bring you closer to your product launch. We hope you found this newsletter helpful and informative. If you have a problem you’d like to solve and are wondering how prototyping can help you, feel free to contact us at business@analogydesign.co and schedule a free discovery call. Thank you for reading and stay tuned for the next issue of Beyond The Surface!

Analogy Is a Bangalore based Product Design studio that has been working with clients small and large to create harmonized and relevant user experiences by combining physical and digital products and services for more than a decade. We are an award winning global studio that has resources in Singapore, US, Europe and APAC. We specialize in Industrial design, Interaction design, HMI and product branding to create one stop solutions for our clients. Some of our previous and existing clients include Google, Panasonic, Marvel Entertainment, A.P. Moller - Maersk, Bajaj Electricals Ltd, Mondelēz International, boAt Lifestyle, Borosil Limited. We specialize in creating fresh new solutions for Consumer Electronics, Automotive, Lifestyle & Tech Accessories, Audio & Video products, Sporting Goods, Footwear, Mixed Reality Hardware and Scientific Products.